As a last example of my CCC Sharpening lecture in October, I did a correction of an underwater image. Later, I’ve been solicited with a very gentle email to show once again all the steps, and I asked my dear friend the photographer Davide D’Angelo: he kindly got me in touch with his colleague the underwater photographer Paolo Fossati, author of the picture I’ll show throughout this post. Thanks so much to both of you! So here it is, a little sharpening case study.

Final, processed version (click for a larger image) – © Paolo Fossati
The original file comes as a RAW file from Nikon D80 (3872 x 2592 px just to keep in context the sharpening radii that I’ll be using), and as far as I’ve been able to understand from my Google quest, it depicts an actinia (the red thing with tentacles) in good company of an anemonefish (the yellow Nemo). The picture comes from Paolo Fossati’s trip in the Arabian Seven Reef (full gallery page). Even though, compared to the CCC, I’ve some more room here to explain what I’m doing, I will take for granted some basic color correction terms and tools for the brevity’s sake.

Start version, zeroed in Adobe Camera Raw – click for a larger image
Part 1 – Color and tone
I’ve to admit that I’ve zero experience with this kind of naturalistic images, while Davide D’Angelo knows certainly better than me their (many) pitfalls: besides his works on stage in theaters and as an IR landscape photographer, he’s used to scuba diving as well, so he’s acquired peculiar skills for underwater photography retouching.

Adobe Camera Raw default – click for a larger image” margin-bottom=”5
On my CCC lecture I worked on a different (and a lot easier) image, so I could show the steps for the color correction part too. Here the original is trickier and, believe me I don’t tell this to hide any secret sauce at all, I can’t exactly replicate (nor I exactly remember) how on earth I got to the intermediate version – the one that will be my base for the sharpening moves. Although, you may agree that the default ACR conversion is utterly different both from the zeroed version above (which was my actual starting point) and my intermediate result. Basically, the correction steps involved:
- Exporting the raw to ProPhoto RGB (a workspace that I usually keep away from me, but is needed to avoid Red channel’s clipping, critical here in order to have more room for further processing).
- An early conversion to Lab working with, and blending to the L channel for contrast.
- Lot of a and b curves tweaking and masking, MMM and Helmholtz-Kohlrausch actions from Dan Margulis’ PPW panel.
-
If RGB is needed again, I’ll use sRGB (which, by the way, obliterated almost entirely the ugly banding in the
skywaters up above, that has been a pain in the neck ever since the Camera Raw export).
One of the color correction basic rules (neutral shadows) is less mandatory here perhaps – everything is drowned in deep blue, except for the area hit by the flash light in the foreground. Moreover, I’ve never been undersea (nor I will) so I haven’t the faintest idea of what these creatures would look like to a scuba diver approaching them.

Intermediate version – click for a larger image

Details – click for a high-resolution preview on a new window
That said, my intermediate version is maybe a little bit… too colorful, but it’s not that bad anyway, at least in my opinion. If you’re interested in comparing retoucher’s styles, have a look to the Paolo Fossati / Davide D’Angelo version – more “dramatic” and 3D, if you will. I’ve been less “photographic” and more “descriptive” perhaps – it may remind you the esthetic of some New Guinea paradise bird watercolors from the 18th century, if that wouldn’t sound totally crazy.
Part 2 – HiRaLoAm
Now the time to plan our sharpening strategy has come. Generally speaking I’d like to affect less the blue water than the animals to keep the focus on them, so while we’re in Lab the b channel (blue/yellow opposites) may work as a good mask. An HiRaLoAm (High Radius Low Amount) pass can’t hurt, so you may:
- Duplicate the background layer, call it HiRaLoAm.
- Activate the L channel only, and apply the filter Unsharp Mask with Amount: 500 – Radius: 12px – Threshold: 0px.

HiRaLoAm full blast – click for a larger image
Yes! It looks like crap! Just don’t worry, because:
- Create a blank layer mask to the HiRaLoAm, and apply the L channel from the background layer to it. Almost back on track.
- Lower the HiRaLoAm layer opacity to something around 40%.
 Since a layer mask is involved, I prefer to beat hard with the filter – then, afterwards, lower the opacity to taste. You’ve more flexibility this way, in my opinion.
The sharpening went to the L channel alone, to avoid any bad, bad color shift.
There’s still a problem – the water has gained too contrast and it’s distracting, not to mention the lighter halos around small fishes. So as we said before:
- Double click to the HiRaLoAm icon in the Layer palette to open the Layer Style – Blending Options window, and move this way the Blend If sliders in order to restrict the effect to the “hot” parts of the b channel, cutting the “cold” ones – i.e. the blue water.
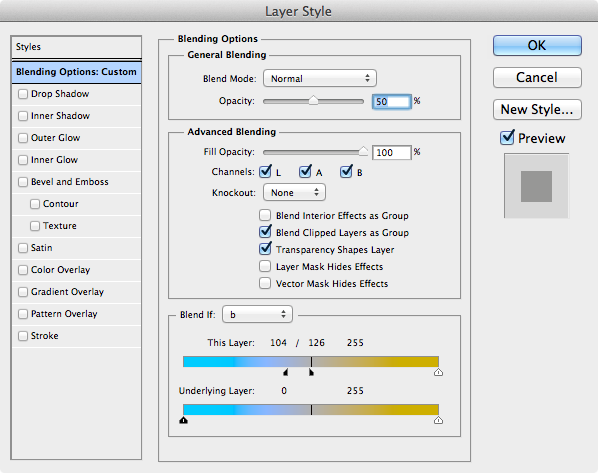 The Blending Options are a way to restrict the effect of a layer (no matter which kind of layer), depending on its content or the content of the layer beneath it. The Blend If acts as a threshold: first you select which channel to use as a base, then click and drag the slider (or ALT+click to separate the slider creating a smooth transition) to define if and where the upper layer visibility will be cut, depending on the channels range the sliders don’t encompass.
- Type at the same time (Command + Option + Shift + E) if you’re on a Mac, (CTRL + ALT + Shift + E) if you’re on a PC. A new top layer is created and filled with the “merged visible” content. Trash the HiRaLoAm layer below it, and rename as HiRaLoAm the newly created one.

After High Radius Low Amount sharpening application – click for a larger image

Details – click for a high-resolution preview on a new window
Part 3 – Where are we at?
Ok, pause. So far I’ve corrected the color with some unrepeatable moves, and the result of this is our friend the background layer, a safety net if any of the subsequent sharpening move will mess everything. Then I’ve got a second layer on top called HiRaLoAm, which used to be a masked layer with BlendIf options, that has been merged so you can now deal with it as a normal, standard and boring layer. HiRaLoAm is used to add kind of local contrast (while it’s not a true local contrast enhancer like my beloved ALCE (don’t you know ALCE?). I need just one more thing and I’ll be done.
Part 4 – Traditional sharpening
Without any further ado, please:
- Duplicate the HiRaLoAm layer and call it “USM” (which stands for Unsharp Mask).
- Activate the L channel only of the USM layer and apply, guess what, the Unsharp Mask filter with Amount: 500 – Radius: 1.4px – Threshold: 0px.
Pretty harsh, maybe? No problem, since as the great maestro Dan Margulis teaches, the light halos are the most disturbing ones: you just need a way to halve them:
- While keeping the USM layer’s L channel as the only one active, Apply the L channel from the HiRaLoAm layer, Darken blending mode, 50% opacity.
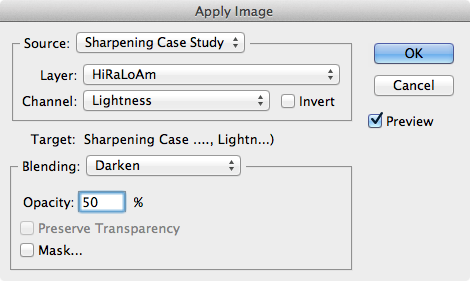 This way, the USM darkening halos are still there, while the lightening ones have been lowered by 50% – does it make sense to you?
The very last step is to apply a mask that cuts the effect in the background water – we may use the b channel as we did before, but there’s an alternative that may better fit our needs – or just show that there’s more than a single solution to any problem. Can you guess which alternative?
- Duplicate your entire document without flattening, call it RGB. Keep only its background layer, happily trash everything else. Convert to our good old friend the sRGB space.
- Back to the original Lab document, add a layer mask to the USM layer, and apply into it the R channel from the RGB document.
- Curve the Layer Mask to lighten it a bit (so it lets pass more of the sharpening effect – masks work this way).
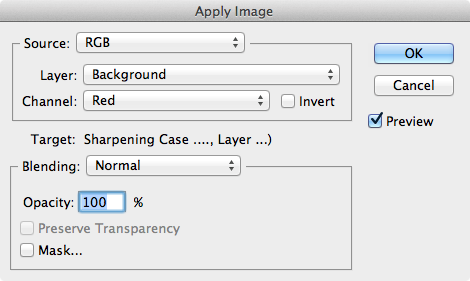 In this particular situation, we want a mask that’s pitch black in the water, so the R channel is a priori a good choice. Moreover, if you pick the R channel from a small RGB workspace, it will come already and nicely clipped in its shadows, so here: the smaller, the better.

Red channel as a mask

Layers palette
We’re happily done now! You’ve ended up with a three layers document with a color corrected background, a middle layer with HiRaLoAm targeted to the foreground, and a top layer with traditional USM, halved in its light halos, and masked appropriately. It’s been longer to describe it than to actually perform all the steps, believe me. Do you feel I went too far? You’re in good company but: No Problem, lower the opacity of the HiRaLoAm and/or USM layers to your taste – it’s always better to overdo, being able to step back.
Anyway, if you feel lost somewhere, add your question as a comment to this post and I’ll do my best to let you swim in shallow waters.
Final, processed version (click for a larger image) – © Paolo Fossati

Details – click for a high-resolution preview on a new window
Credits
I wish to thank sooo much Davide D’Angelo for his help, and Paolo Fossati for the kind permission to show his picture. Please, do yourself a favor and visit their websites – wonderful images are there, waiting for you.