Double USM is the brand new Sharpening script for Photoshop that I’ve coded, let me introduce it to you in a three posts series! Post #1, this one, I’ll be discussing sharpening basics and how Double USM is different. Post #2 is about the interface, functionality and batch processing. In post #3 I’ll show you real world examples, for traditional, HiRaLoAm and mixed sharpening.
UPDATE
</p>
This is a 3 part series on the Double USM Photoshop plugin.
Even if the version used in this article is older than the current one, the sharpening concepts still apply! Find the new version announcement here
- Introduction (sharpening basics, Double USM) <- you’re here
- Features (interface, functionality and Batch processing)
- Examples (case studies)
Double USM v2 is available for sale on my website CC-Extensions. </div> </div>
Why bother with Sharpening at all?
 If you look away from the monitor for a moment, you’ll see the world you live in as a source of an apparently endless detail; things around you can be probed up to the microscopic level (provided you’ve got a superhero eyesight) and still reveal new features.
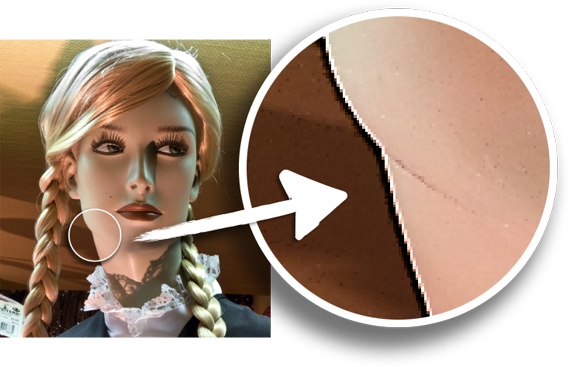
Which is not a big news, as it’s not a big news to discover that digital captures of the world (either a landscape, a portrait, a still life…) you’ve taken with some expensive equipment don’t contain such an infinite detail – just a portion of it. It’s not CSI, zoom in 10.000% on your 16bit RAW file and you’ll be staring just at a huge, single pixel.
The fact you’re not allowed by the laws of the universe to capture but a portion of the world’s infinite detail, results in a softer picture – if you compare what you perceive out there in the wild, with your digital images. Softness you’ve got to compensate for, especially if pictures are going to be printed (that is, they’ll undergo another reduction of information levels available).
Luckily, our perception is easily deceived by appearances – if you inject your pictures with a little bit of the right drug, they suddenly look “right”, or “better”. That drug is called sharpening.
Halos
How is it that we’re tricked into perceiving things as more detailed? Short answer: by means of halos around borders, that’s the little magic. Long answer would mention things like “retina’s receptive fields“, “lateral inhibition” and “Mach bands” – but I won’t go any further here, even though they’re fascinating topics.
So: a border is found where two differently perceived areas meet: it may be one darker the other lighter, different color, tone, etc. What sharpening as we know it in the Photoshop’s implementation (aka Gaussian Sharpening) does, is to create two tiny gradients around borders. A darker one spreading inside the darker area, a lighter one spreading inside the lighter area. If those artifacts are small enough to be noticed as just artifacts, our perception blends them and we get the impression of more detail – we’re that easy as humans, you see.
UnSharp Mask filter
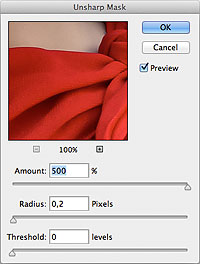
Photoshop owns one since version 1.0. UnSharpMask (USM from now on) lets you specify three parameters to describe the sharpening artifacts (that is: halos) features.
- How strong are they (Amount)
- How widespread are they (Radius)
- Should they be applied everywhere (Threshold)?
The three are independent controls: as far as so called “traditional sharpening” is involved, you usually set large Amounts and relatively small Radii – as in the screenshot, which is a reasonable starting point for web-targeted images; while the contrary may give interesting results as well (read along about HiRaLoAm).
Find below the controls’ effect on a synthetic test file.
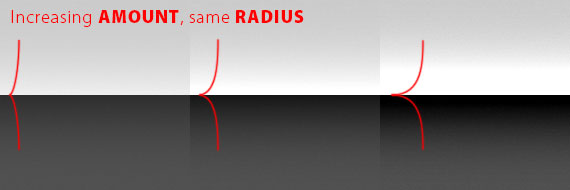
Amount: the Halos’ strength
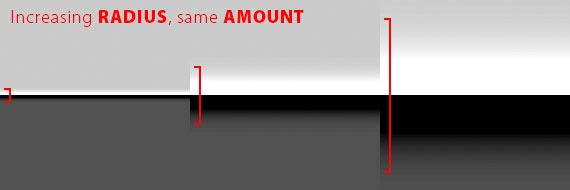
Radius: the Halos’ thickness
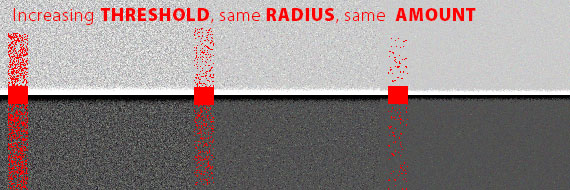
Threshold: the Halos’… threshold
I must mention one thing: we all know what oversharpening means – it’s a delicate topic, photographers go nuts when retouchers oversharpen their images – i.e. they are strong handed with USM filter.
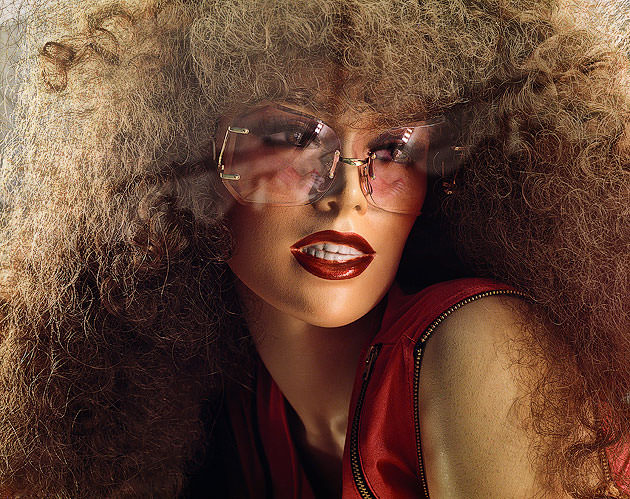
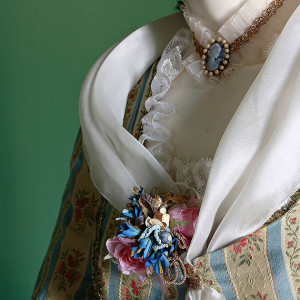
What do you think about, is this picture oversharpened?
The psychological threshold (how much USM is too much?) is to some extent a subjective choice. As a retoucher, I admit I’ve kind of a higher tolerance (I know for instance that printed images require, and can stand, much more USM that you’d consider fair just looking at them in a monitor).
So what’s wrong with USM?
 My color correction maestro Dan Margulis did study the topic of sharpening (among the rest) extensively, and came up with some experimental discoveries worth mentioning.
What is that we’re bothered the most with, when we look at oversharpened pictures? Halos of course, but he’s been the first one to ask the simple question: “Ok, but which kind?”.
Sharpening introduces at the same time Light Halos and Dark Halos – do we respond to them in the same way?
Take a look at the following picture.

A: original image; B: sharpened image (Light + Dark Halos); C: Light Halos only; D: Dark Halos only.
We may agree that the original version is way too soft, while the sharpened’s gone too far. But… what about the rest? Light Halos, as well, may seem too much, while we may be perfectly fine with Dark halos.
That is to say: we’re easily disturbed by Light halos, while Dark ones are less annoying.
Whether it is their strength (Amount), or their size (Radius) that bother us, we’re perhaps not sure about – but Light Halos should be toned down, somehow.
So far, an easy and well known way to do this was to apply USM on a layer, duplicate it, set one layer to Darken (Dark Halos only) and the other to Lighten (Light Halos only) and lower the latter’s opacity. Which is somehow equivalent to lower the Amount of the Light Halos altogether.
But what about if Light Halos could be made smaller (Radius) too?
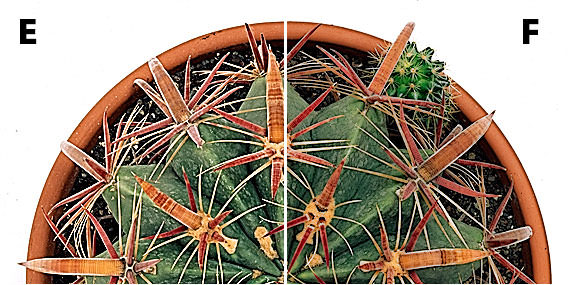
E: image sharpened traditionally. F: sharpening where Light Halos are half the strength of, and two third thinner than, the Dark Halos. (heavy handed correction just to show you more clearly the difference!)
The picture will benefit from a sharpening that is more robust on the dark side (stronger in Amount, wider in Radius), and less on the light side (weaker Amount, narrower Radius), as you can see in the above comparison.
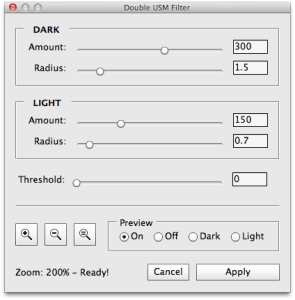
Double USM user interface: Amount and Radius controls for both Dark and Light Halos
Double USM
Since drum scanners’ softwares did have this feature decades ago, why not implementing it back in Photoshop now? Double USM lets you tweak both Amount and Radius for Dark and Light halos separately, at the same time.
A double set of sliders can be useful not only for traditional sharpening, but it gives unprecedented control also for HiRaLoAm (as Dan Margulis calls it: sharpening with unusual High Radius and Low Amount, used as a local contrast enhancer), or as a tool for mixed sharpening (Dark Halos: traditional, Light Halos: HiRaLoAm).
You may be tempted to do the trick with Darken and Lighten layers but save your time: alas it can’t work, as I’ve demonstrated here.
UPDATE
</p>
This is a 3 part series on the Double USM Photoshop plugin.
Even if the version used in this article is older than the current one, the sharpening concepts still apply! Find the new version announcement here
- Introduction (sharpening basics, Double USM) <- you’re here
- Features (interface, functionality and Batch processing)
- Examples (case studies)
Double USM v2 is available for sale on my website CC-Extensions. </div> </div> </div>