[See newest updates at the bottom of the article]
According to Apple (read here the whole article):
The Apple notary service is an automated system that scans your software for malicious content, checks for code-signing issues, and returns the results to you quickly. Notarization gives users more confidence that the Developer ID-signed software you distribute has been checked by Apple for malicious components. Notarization is not App Review.
Basically, it is some kind of whitelisting. From macOS Catalina on (late September 2019), notarization is mandatory: your installers won’t work if you don’t do your homeworks.
Gatekeeper
When your customers run your product’s installer.pkg, macOS Gatekeeper connects with Apple, checking whether the file you’re executing has been vetted and thus can be run safely. If this is the case, Gatekeeper pops up the usual warning anyway:
Because users can also be offline, you can staple the notary service’s response ticket directly to the installer – an optional but recommended step.
What you need
- An active subscription to the Apple Developer Program ($99 per year).
- Xcode 10 or newer (free download via the App Store).
- An app-specific password defined for your AppleID (see here for instruction).
Notarization walkthrough
I assume that you are at least vaguely familiar with the topic of code signing. I’m going to show you how to notarize a .pkg installer; caveats for slightly more complex scenarios (e.g. a .dmg that wraps a .pkg and/or .app plus other assets) will follow in a later section.
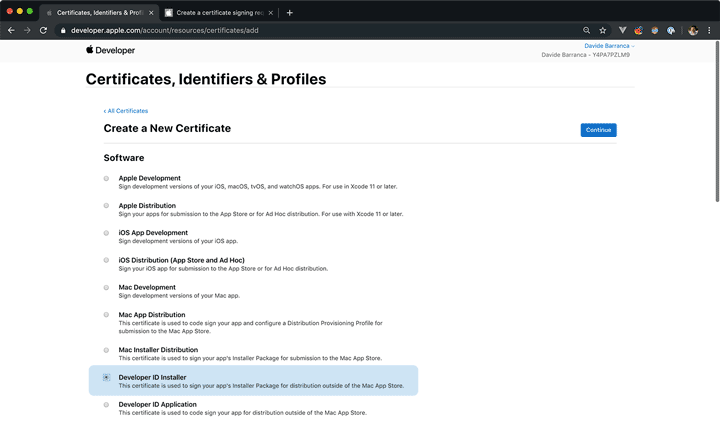
1. Create a DeveloperID Installer certificate
Log in the Apple Developer portal portal and follow the “Certificates, Identifiers & Profiles” section. Create a new Certificate: when asked, select DeveloperID Installer:
Follow the instruction to complete the process – you’ll be required to open the Certificate Assistant from the Keychain Access application to create a Certificate request, then upload it to the Developer Portal. When the process is complete, you’ll be presented with a download link for your certificate, to be imported via double click into the Keychain Access app.
You can verify that the certificate has been successfully installed opening the Terminal and pasting the following command:
security find-identity -v

1) 6A7C3D1A28FA5483E5E8857F2A12EDC71731CAED "Developer ID Installer: Davide Barranca (I2WD7PWGD9)"
  1 valid identities found
Keep note of the string between quotes that says "Developer ID Installer: ...".
2. Signing the Installer
You don’t just need to notarize an installer, it must be signed first. Assuming that the installer.pkg file sits in the folder you have cd to in the Terminal window, you sign the installer with the following command (the output I’ve got comes right below the first line):
productsign --sign "Developer ID Installer: Davide Barranca" ./installer.pkg ./installer_signed.pkg

  productsign: using timestamp authority for signature
  productsign: signing product with identity "Developer ID Installer: Davide Barranca (I2WD7PWGD9)" from keychain /Library/Keychains/System.keychain
  productsign: adding certificate "Developer ID Certification Authority"
  productsign: adding certificate "Apple Root CA"
  productsign: Wrote signed product archive to ./installer_signed.pkg
Let’s break down that:
productsignis the utility in charge of the signing.--signis the argument that defines the Identity associated to the Apple issued certificated, which follows as a string../installer.pkgis the relative path (can be absolute as well) that points to the file you want to be signed../installer_signed.pkgis the path of the new, signed file that is going to be created byproductsign.
Of course you should substitute the "Developer ID Installer:" string with the one you’ve noted in the previous section, as well as the files paths.
You can verify that the installer_signed.pkg has been really signed with:
pkgutil --check-signature ./installer_signed.pkg

   Status: signed by a certificate trusted by Mac OS X
   Certificate Chain:
    1. Developer ID Installer: Davide Barranca (Y4PA7PZLM9)
       SHA1 fingerprint: 3A 7C 3D 1E 28 AA 54 83 E5 E8 11 7F 2A 12 ED C7 17
       --------------------------------------------------------------------    2. Developer ID Certification Authority
       SHA1 fingerprint: 3B 16 6C 3B CC C4 B7 11 C9 FE 22 FA B9 13 56 41 E3       --------------------------------------------------------------------    3. Apple Root CA
       SHA1 fingerprint: 61 1E 5B A2 2C 59 3A 08 FF 58 D1 61 E2 24 52 D1 98
3. Sending the notarization request
Keep handy the app-specific password you’ve requested from your AppleID account (if you’ve not done it yet, follow the instruction here). Let’s say that it is cvbs-epfg-sizx-olwd. The command I’ve used to request the notarization is:
xcrun altool --notarize-app --primary-bundle-id "com.ccextensions.alce3" --username "YourAppleID@mail.com" --password "cvbs-epfg-sizx-olwd" --file "/full/path/to/the/installer_signed.pkg"
Let’s break down that.
xcrunis used to find and execute XCode commands.altoolis the executable that performs the notarization request.--notarize-appis the flag that tellsaltoolto request notarization.--primary-bundle-idlinks to the installer I’m submitting its unique bundle id (in my case"com.ccextensions.alce3", substitute it with yours)--usernamewants your AppleID.--passwordwants the app-specific password you’ve requested (here,"cvbs-epfg-sizx-olwd")--fileis the flag that tellsaltoolwhich file to upload. Please note that I had to specify the absolute full path (not the relative that starts with./) between quotes
The command takes a while to upload the file, and gives you zero feedback; after a while, if the process has been successful, you get back something like:
2019-09-18 16:30:35.659 altool[8788:92462] No errors uploading '/full/path/to/the/installer_signed.pkg'.
RequestUUID = 181638fb-a618-2298-bff0-47fa79f01326
Keep note of the RequestUUID string.
At this point your request for notarizationhas been sent to Apple, and you have to wait for them to process the file.
Mind you: if you get “Error: You must first sign the relevant contracts online. (1048)” (as it has happened to me several times) don’t panic.
You can launch XCode to check whether it asks you to accept its Terms and Conditions, or run the following command to agree from the Terminal:
sudo xcodebuild -license
Then try checking at iTunesConnect, in the section “Agreements, Tax and Banking”. The “Paid Apps” list item may have a Status of “Pending User Information”1, but there shouldn’t be any Agreement pending (usually their warnings are listed separately).
If, still, nothing works it may be a glitch on Apple’s side, so wait a couple of hours and try again.
4. Checking the notarization status
In the Terminal, enter:
xcrun altool --notarization-info 181638fb-a618-2298-bff0-47fa79f01326 --username "YourAppleID@mail.com" --password "cvbs-epfg-sizx-olwd"
The command uses now --notarization-info to ping the current status, and expects the same RequestUUID string that has been sent you in response of the original request. The result is something like that:
2019-09-18 16:31:48.449 altool[9133:95654] No errors getting notarization info.

   RequestUUID: 181638fb-a618-2298-bff0-47fa79f01326
          Date: 2019-09-18 14:30:36 +0000
        Status: in progress
    LogFileURL: (null)
Please note the in progress status. At some point the result will be different, and hopefully similar to this one:
   RequestUUID: 287628eb-e628-4998-b4b0-47fa79f07386
          Date: 2019-09-18 14:30:36 +0000
        Status: success
    LogFileURL: https://osxapps-ssl.itunes.apple.com/awfully/long/URL
    Status Code: 0
Status Message: Package Approved
The installer has been successfully notarized!
If, for some reason, you have to perform several requests and want to check the notarization requests history, run the following command:
xcrun altool --notarization-history 0 --username "YourAppleID@mail.com" --password "cvbs-epfg-sizx-olwd"

Notarization History - page 0

Date                      RequestUUID                          Status  Status Code Status Message
------------------------- ------------------------------------ ------- ----------- ----------------
2019-09-18 14:30:36 +0000 181638fb-a618-2298-bff0-47fa79f01326 success 0           Package Approved

Next page value: 1768817026000
5. Stapling the ticket to the file
As I wrote, this step is optional but highly recommended: Gatekeeper will be able to find the whitelist info in the file itself, without the need to perform an online check.
xcrun stapler staple "/full/path/to/the/installer_signed.pkg"

Processing: /full/path/to/the/installer_signed.pkg
The staple and validate action worked!
The command here is much simpler: you don’t need to pass any RequestUUID string yourself, for stapler will do the call home at Apple’s on its own.
You can check stapling details with:
stapler validate --verbose "/full/path/to/the/installer_signed.pkg"
The result is too long to paste here, and frankly I’ve no idea what it means: as long as it ends with "The validate action worked!" you should be fine.
And… you’re done 🍾
In my experience the Notarization can take from 60 seconds up to many hours (one time I’ve had the Terminal waiting and checking the status from 3PM to midnight). In theory it should be fast, in practice you can occasionally run into long delays.
Caveats for different scenarios
The example I’ve shown is for one installer.pkg file. Let’s say that you (as I do) deliver to your customers a product.dmg file, that wraps the installer.pkg, an additional uninstaller.app (say, an app-ified AppleScript) and some documentation as well.
In this case, you need to:
- Notarize only the outmost container (here the
.dmg). - Sign all the executable children elements (here the
.appand.pkg) and the.dmgas well.
Please note that in order to sign a .dmg you need a “Developer ID Application” certificate, instead of the “Developer ID Installer” I’ve used for the .pkg
Lastly, things may get a bit convoluted when it comes to extra libraries/bundles that may be called by your panel – if you feel like it’s your case, please read this thread.
UPDATE: DMG Canvas
The software that I use, and recommend, to build .dmg files is Araelium DMG Canvas, which has recently bumped to version 3.x (a paid upgrade, around $10). One of the new features is the possibility to automate the notarization process while building the .dmg itself.
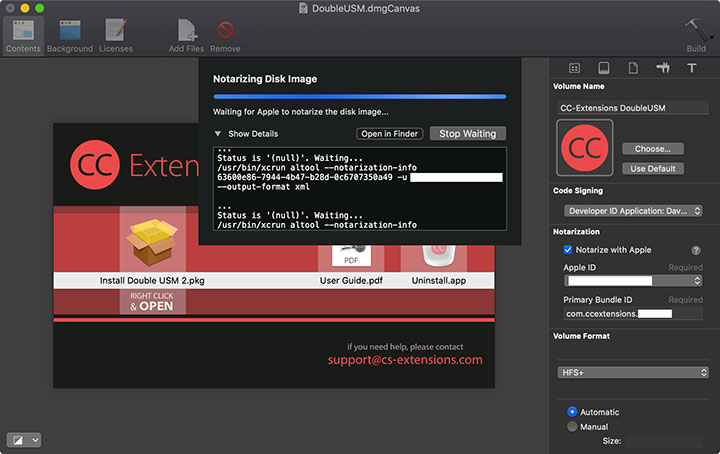
To tell you the truth, the first product I’ve used that for went flawlessly, and in a snap; the second product failed due to a timeout, which sounds very much an Apple issue rather than Araelium’s. Please note that DMG Canvas does the stapling too, which is quite handy, and can be automatized to fit your build system.
UPDATE: Uninstaller app
As I’ve finally upgraded my machine to Catalina, I’m able to experience the entire, happy spectrum of Catalina-related issues. I’ve discovered that with the Uninstall.app the signature I’ve been doing is not enough: the notarization of the outer .dmg fails with the error: "The executable does not have the hardened runtime enabled.".
If this is the case, be aware that you should not export the Uninstall.scpt to Uninstall.app while signing it with the Script Editor (it’s an option in the File > Export dialog). Instead, export it without signature and then use the codesign utility with the -o runtime flag:
codesign -s "Developer ID Application: Davide Barranca" -o runtime /path/to/Uninstall.app
Also, it might happen that the signing process of the .app fails because of the error: "resource fork, Finder information, or similar detritus not allowed". You can spot such digital detritus running:
xattr -lr /path/to/Uninstall.app

/path/to/Uninstall.app: com.apple.FinderInfo:
00000000  50 4C 41 50 6C 74 61 70 00 00 00 00 00 00 00 00  |PLAPltap........|
00000010  00 00 00 00 00 00 00 00 00 00 00 00 00 00 00 00  |................|
00000020
/path/to/Uninstall.app: com.apple.metadata:_kMDItemUserTags:
00000000  62 70 6C 69 73 74 30 30 A0 08 00 00 00 00 00 00  |bplist00........|
00000010  01 01 00 00 00 00 00 00 00 01 00 00 00 00 00 00  |................|
00000020  00 00 00 00 00 00 00 00 00 09                    |..........|
0000002a
/path/to/Uninstall.app: com.apple.metadata:kMDLabel_vtos3pl2xookcnywmtbwlcbnry:
00000000  F2 20 2F 2C 8B D7 B3 8E B9 A9 39 DD 12 79 01 05  |. /,......9..y..|
00000010  BB 76 D8 72 90 73 F2 E9 B2 A3 2A 79 4F 5C 76 F0  |.v.r.s....*yO.v.|
00000020  5B 09 C3 8C 53 5D 90 FA 6D 27 2C 00 86 5E 57 7C  |[...S]..m',..^W||
00000030  DF F9 0B 78 83 19 F9 CA 48 6D 66 21 E9 D9 A8 D4  |...x....Hmf!....|
00000040  5E D2 52 53 A1 94 97 94 C4 3C ED A1 89 FF D4 5B  |^.RS.....<.....[|
00000050  AB 17 0F 53 4F 8A 75 85 FD                       |...SO.u..|
00000059
To clean that mess (whatever it is), run:
xattr -cr /path/to/Uninstall.app
…and the subsequent codesign should complete with no problems.
Support this site!
Please consider supporting my work with the purchase of these books and courses. You can find them all here, bundles available. Thanks! 🙏🏻

PS. I will update the Ultimate Guide to Native Installers and Automated Build Systems as well, I just wanted you to get informed asap.
-
If you don’t plan to sell through Apple, there’s no point in filling the uber-annoying Tax forms, etc. ↩