Filter Forge is a PS plugin; actually it’s more than a PS plugin, Filter Forge is a PS plugins’ container (some 9000 of them, freely available); no really, that’s not as exciting as the fact that Filter Forge lets you build your own PS filters. Visually. Oh listen: follow me in this Filter Forge introduction, I’m gonna show it to you – it’s easier than you think and a lot fun.
Filter Forge has been around for some years. As a technology is remarkably interesting, and now that it gets close to version 4 (currently in beta stage) I’ve decided that it was time to invest some of my money and start exploring it. Basically Filter Forge is both a Photoshop filter and a standalone image processing application (Mac/PC); it comes with several built-in algorithms (i.e. filters), but you’re allowed to download for free about ten thousands of them (not kidding: actual count is 9.388) from their website – made by a lively community of developers. Oh, and of course you’re invited to contribute, since filters building is implemented as a visual, node base operation of dragging & linking components, and rewarded even with a free copy of the software. Read along.
Textures and Effects
Filter Forge biggest strength appears to be texture creation (so if you’re doing any kind of 3D modelling work you should definitely take a look at it). I’m not too much into that, so I’ll just mention that it allows procedural texture creation – which means that you sort of put down the “texture formula” and the software will create the final bitmap resolution-independently, in a seamless tiling fashion. Which is kind of cool, to put it mildly: few examples as follows (look at them and keep whispering “procedurally generated, seamless tiled, 5.000 of them…“).
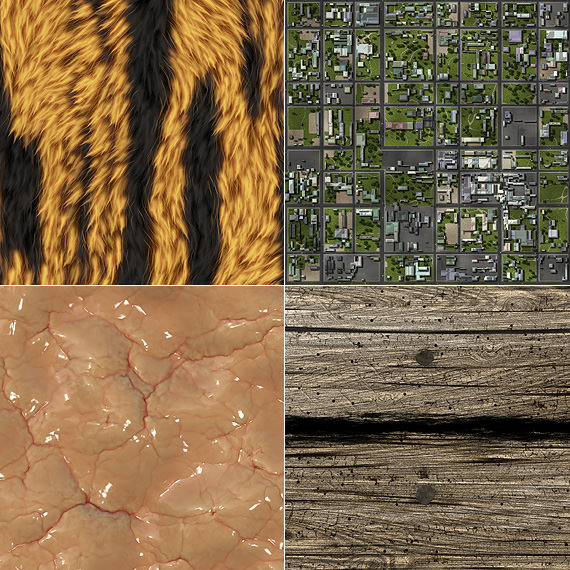
Soft Fur (by Heliagon), Suburbia (by ThreeDee), Biologic I (by Aurum), More Rough Wood (by Sharandra).
High resolution image are of course much more detailed than I’m allowed to show here!
Each texture, in turn, has its own set of generating parameters that you can tweak in order to get different results – and several ready made presets for your convenience.
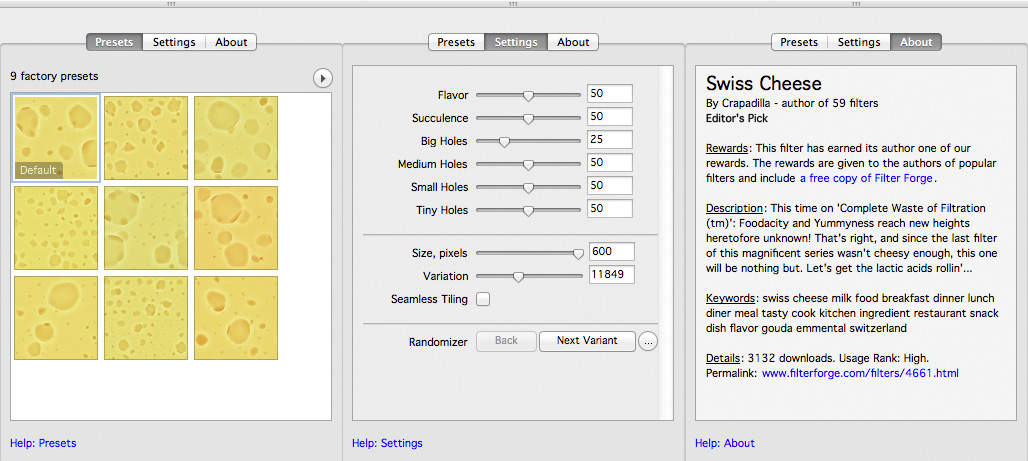
Yes, you can procedurally generate this one too (Swiss Cheese, by Capadilla)
That said, it’ fair to say that FF engine is astonishingly powerful.
Mind you: I’m not gettin paid from them to soak this post with wild enthusiasm, it is entirely in-house. I’ve purchased their software (version 3 + version 4 preorder) so I’m not biased. I’ve then decided to affiliate with’em because I really believe it’s a great product, so if you consider trying Filter Forge do it following this link, thanks!
But what interests me the most, because of my background as a PS retoucher (one life is always too short), are Effects filters – the kind of ones you’d apply to 2D pictures (contrast enhancing, artistic effects, etc). On FF website among the about 4.000 algorithms freely available there are true gems, many of which would compete with standalone plugins currently for sale.
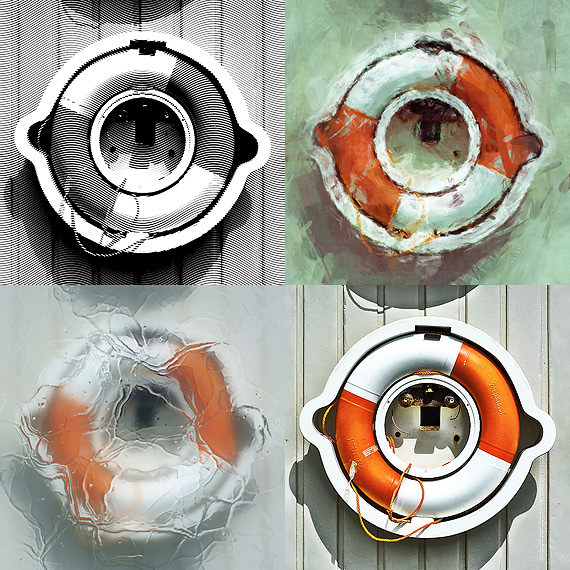
Engraving (by Vladimir Gorovin), Sketchy Painting (by emme), Ice Age (by Crapadilla), Ranged Sharpen (by Skybase)
Filter creation
FF licensing scheme has three different offers: Basic, Standard and Pro. With the exception of the first one, you can build your own filters and (that’s truly amazing) modify any existing filter of the library. Say that you’re crazy about the Ice Age filter, and you wonder how on earth the author has been able to came up with something that funky.
Right click on the filter item, select “Edit filter” and voilà all the magic is explained (provided you can follow what happens):
Yep, that’s what a filter looks like, you’re peeping its algorithm. It’s made with a mix of components that you drag and drop on the workspace and combine together – so that the output of the first become the input of the following ones. And so on and so on – you’ve not to worry about memory management and writing code (even if there’s a LUA based scripting engine that you can work with, customizing your own components). You can really focus on the algorithm only.
To read the full features list, please see Filter Forge website.
Filter creation example
I’m going to show you one of my first (very basic I know, but hey I’m just a FF beginner!) experiments with Filters creation, which took me about 10 minuts from start to finish –
I’ve implemented Dan Margulis‘ “Bigger Hammer” technique, from his Picture Postcard Workflow (PPW). Dan also calls the Bigger Hammer “Shadows/Highlights on steroids”: basically we talk about a contrast normalization technique based upon an inverted overlay that boost highlights detail and help shadows too.

In Photoshop you’d do this way – the Layers palette should be pretty self-explanatory, top-down:
Darkening Layer: a copy of the background, Darken blending mode (opacity to taste) – use it to recover shadows darkness.
Overlay Layer: an inverted channel (either R, G, B) Gaussian Blurred, Overlay blending mode.
Background: the original image.
Unless you turn to scripting, to compare different channels for the overlay (say R instead of G) and blurring radii isn’t possible in real time. I’ve implemented such controls in Filter forge, so that you’re able to: switch the channel for the inverted overlay (R, G or B); modify the Gaussian Blur radius; modify the Overlay layer and Darkening layer opacity (i.e both the overall effect’s and the Shadow recovering strength). As a plus, an overlay usually affect color as well – I’ve implemented it so that Luminosity only is altered. Anyway, here it goes.
1. Setting up the project
First thing I create a blank filter (Filter – New):
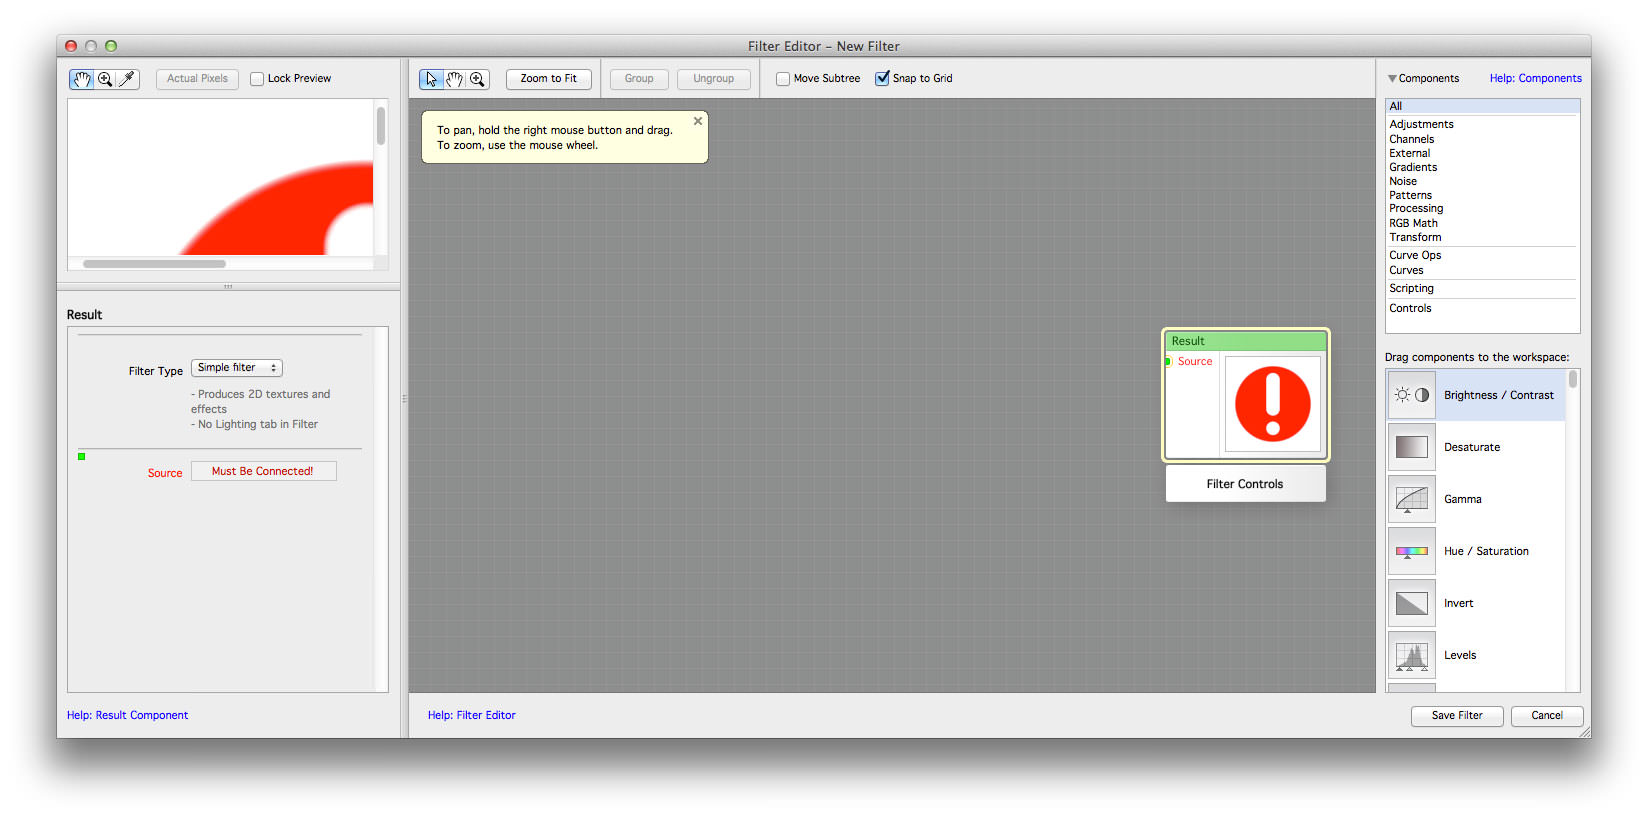
As you see, the Result component (what you’ll get from running the filter in PS) shows a red alert: it has no input yet. Let’s create one dragging from the Components column on the right, under External group, an Image component on the workspace; linking it to the Result. You do a link dragging the green output arrow of a component on to the green input point of another.
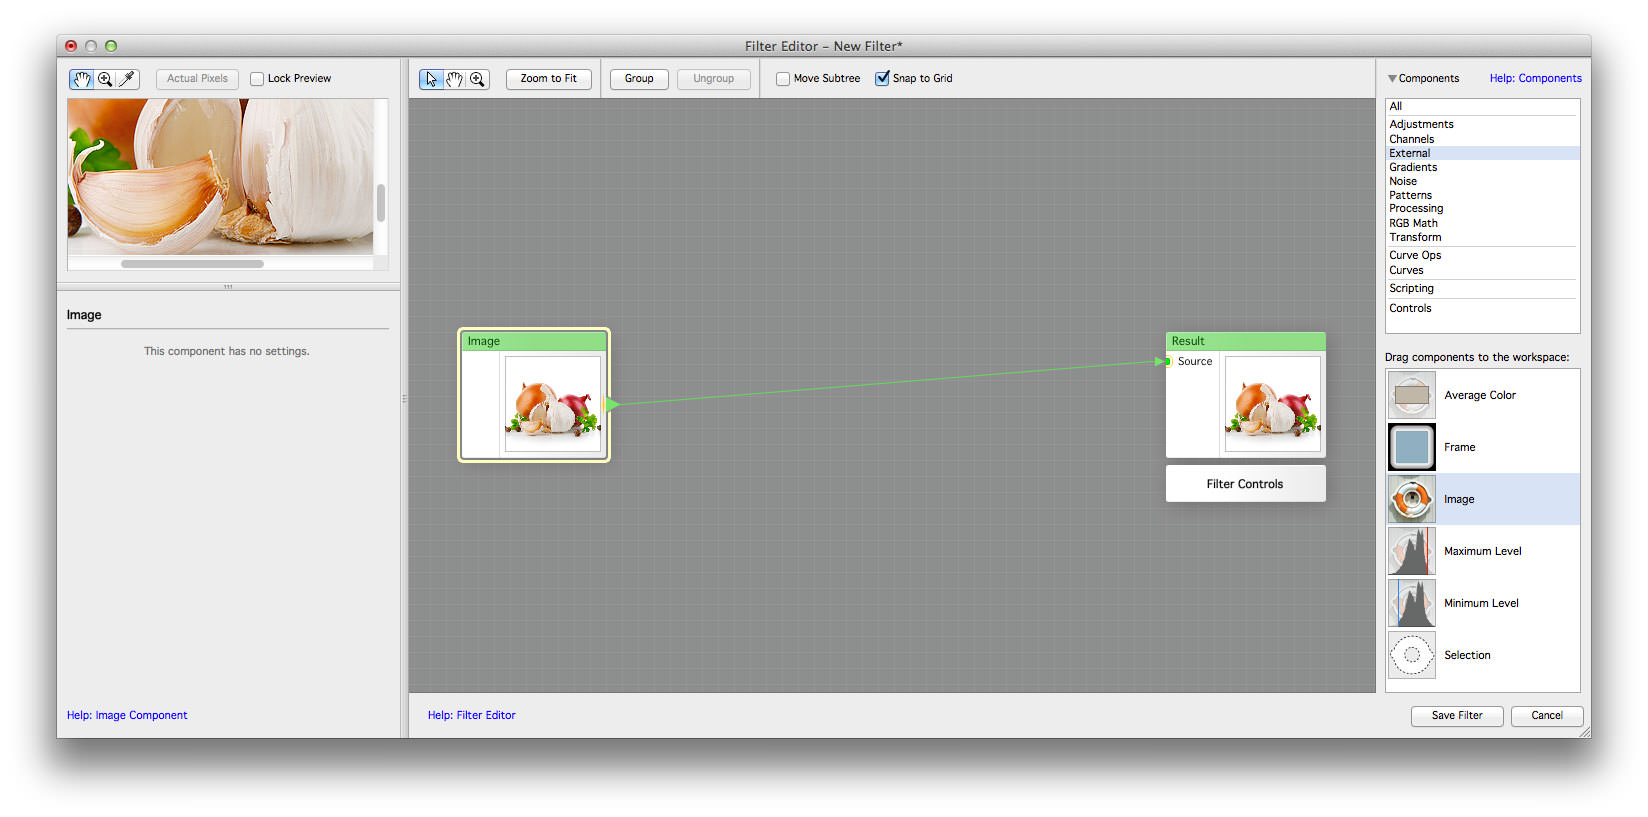
This is a dummy filter that does nothing, i.e. input is equal to output (but it works!). Notice that being italian I’ve selected a more appropriate placeholder image. Let’s start adding interesting pieces.
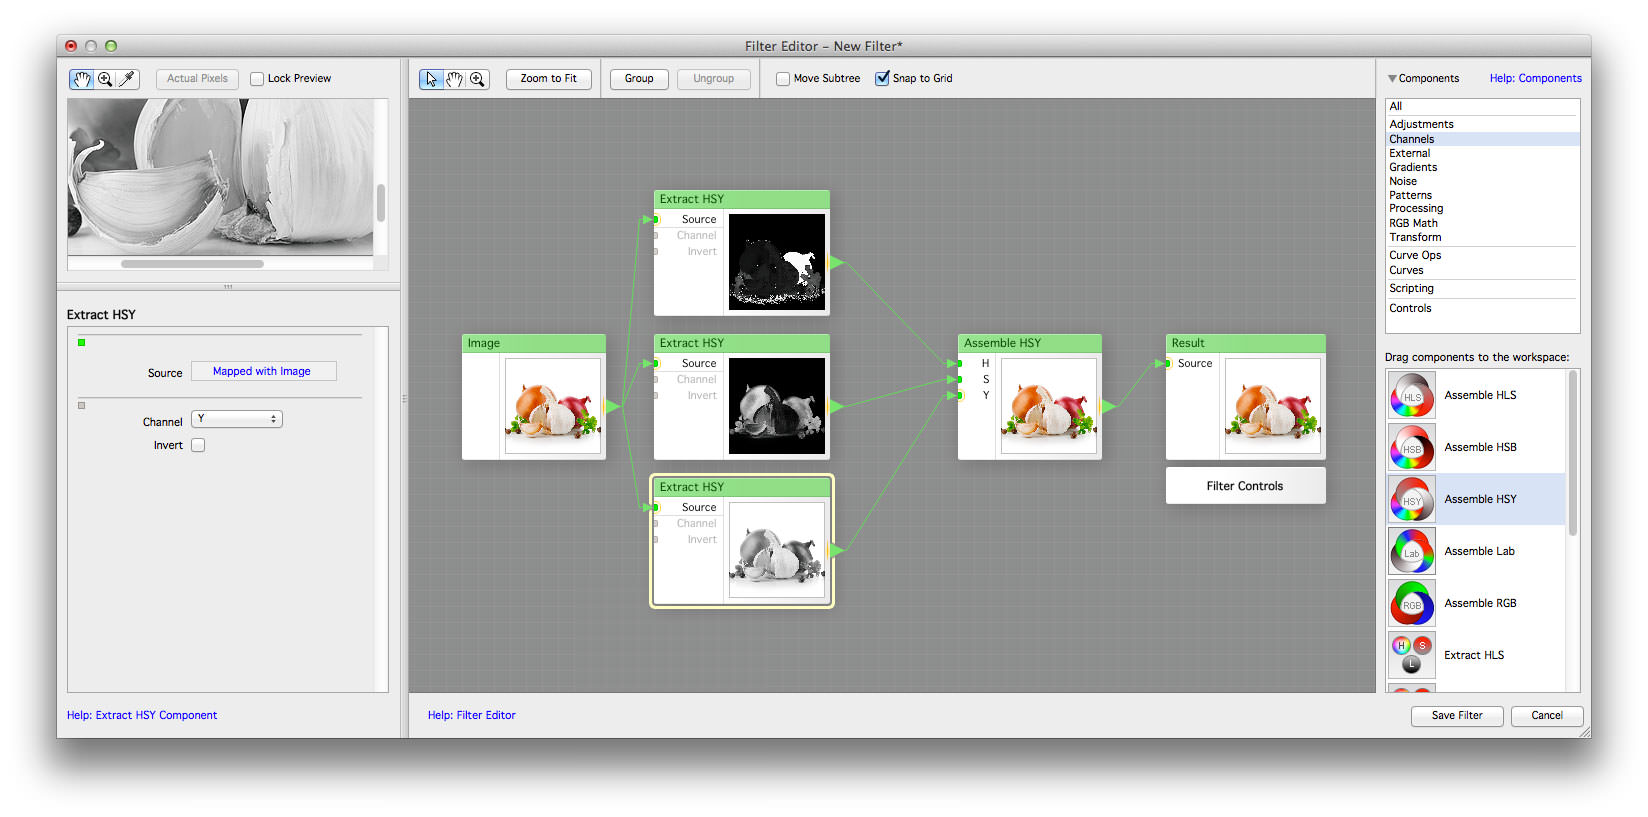
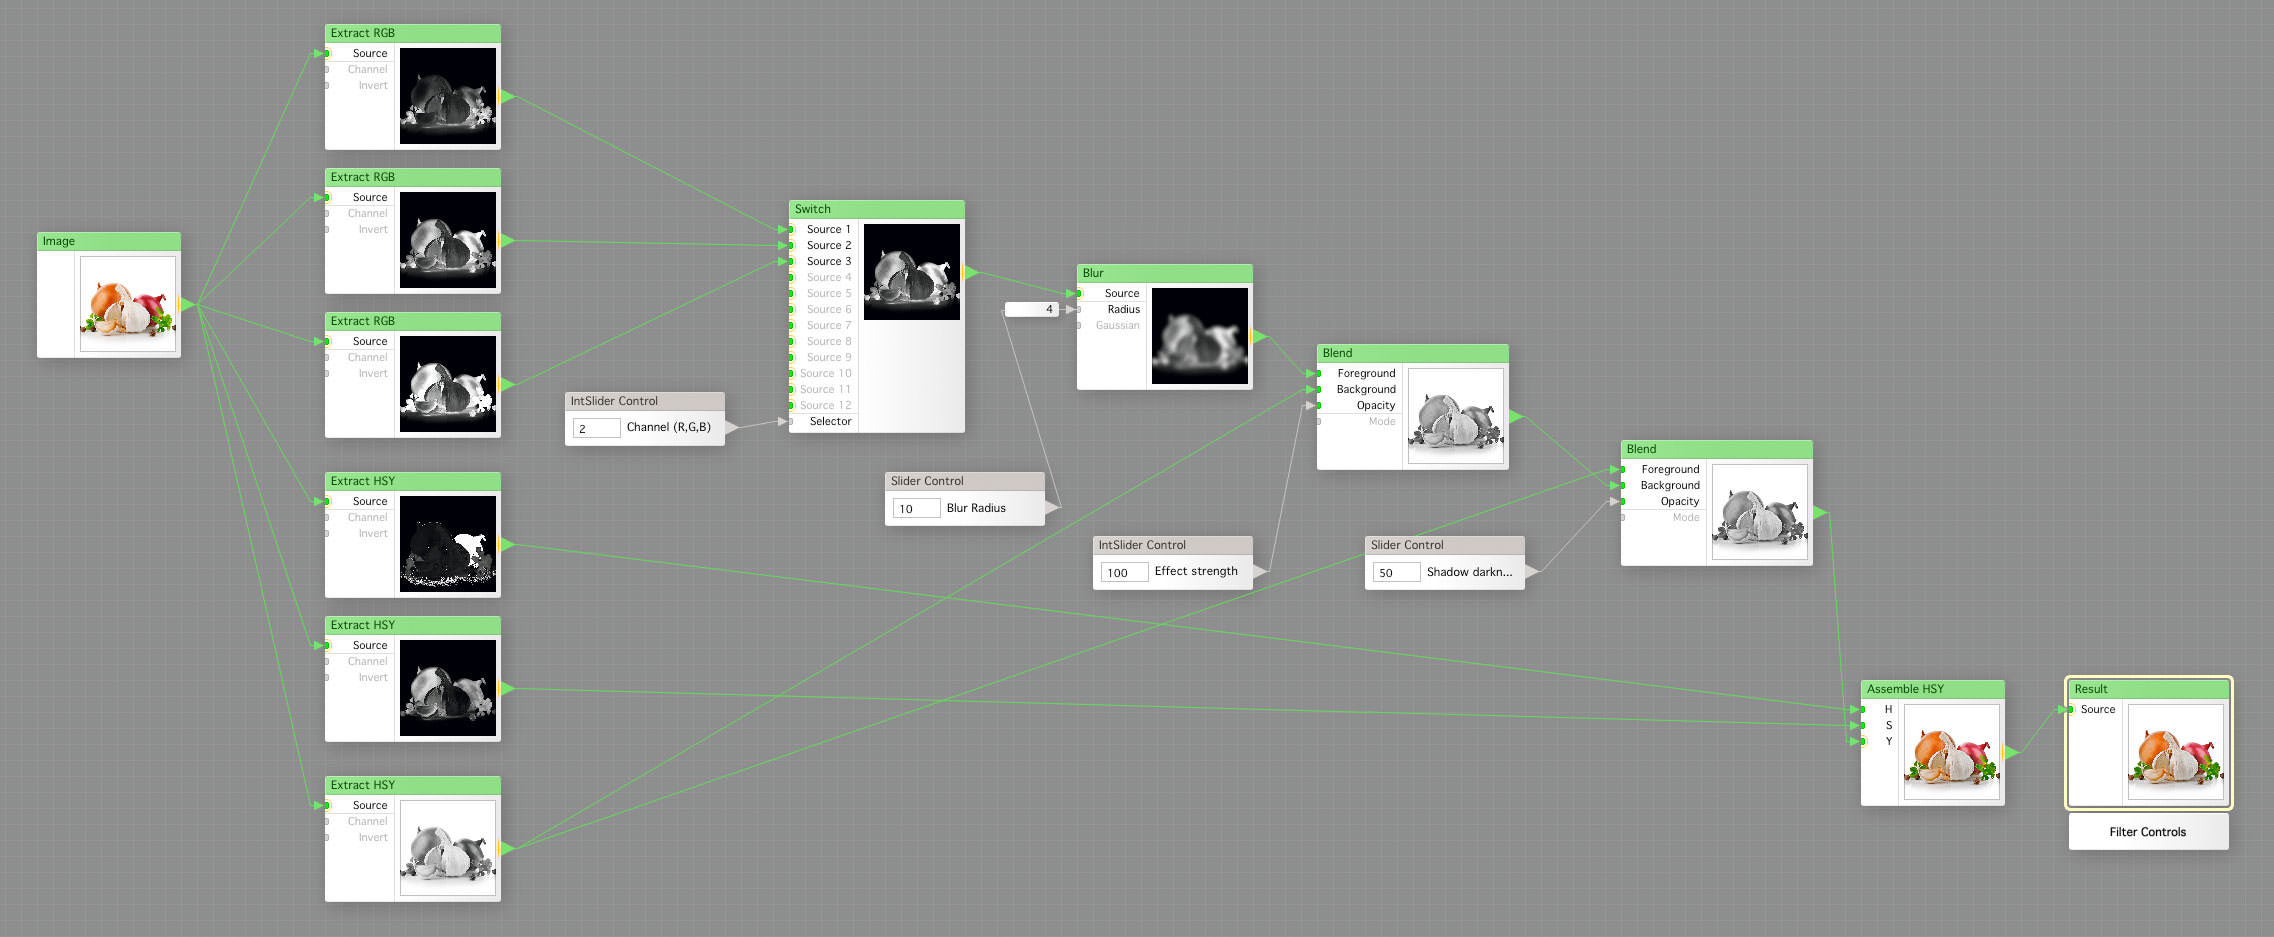
2. Extracting Luminosity
One important feature is to leave color alone working with a luminosity channel. FF implements RGB, Lab, HLS, HSB, and HSY colorspaces. Apparently, HSY lightness (Y) channel takes human perception of color into account: it looks promising, so I’ve added three Extract HSY components and one Assemble HSY to split and recombine channels, linking them as you see in the screenshot – from now on I’ll be dealing with the Y channel only.
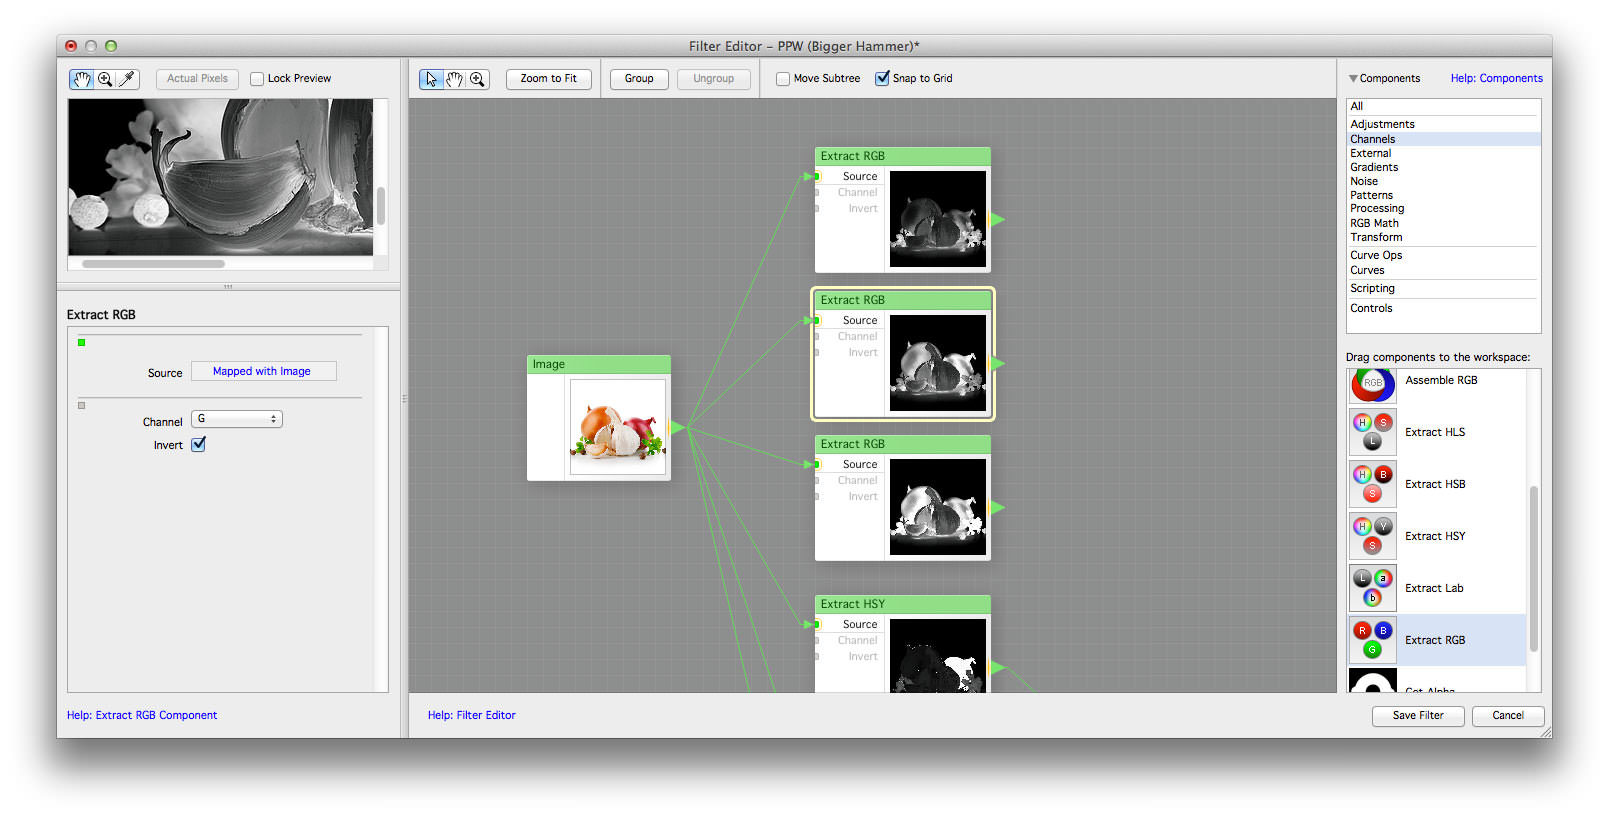
3. Extracting R, G, B channels
I now need some channels to be used for the inverted layer blending (in overlay). I’ll stick to R, G, B for the clarity’s sake, but nothing would prevent me implementing Lab and HSY as well. So here they are three Extract RGB components hardcoded to output the desired channels (inverted, see the checkbox on the left column).
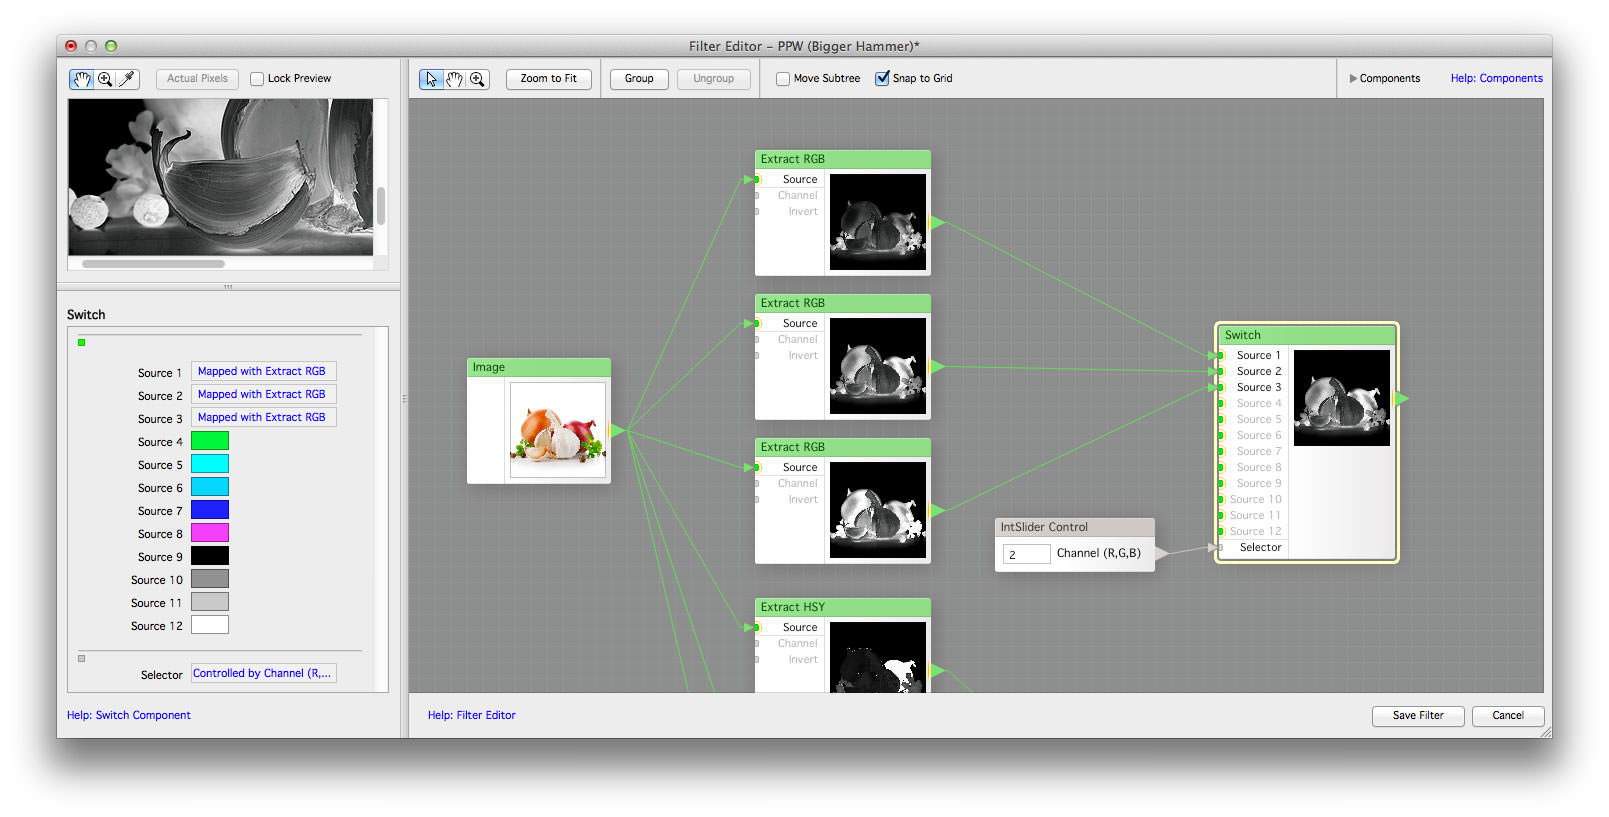
4. Building a Switch
FF implements Controls, which are a way to let the user, uhm, control the filter’s values. Alas, there’s no built in Radio-button set, so as a workaround I’ve to use a Switch component linked with an IntSlider. The Slider ranges 1-2-3, which enables the R, G, B positions of the Switch (i.e. 1=R, 2=G, 3=B).
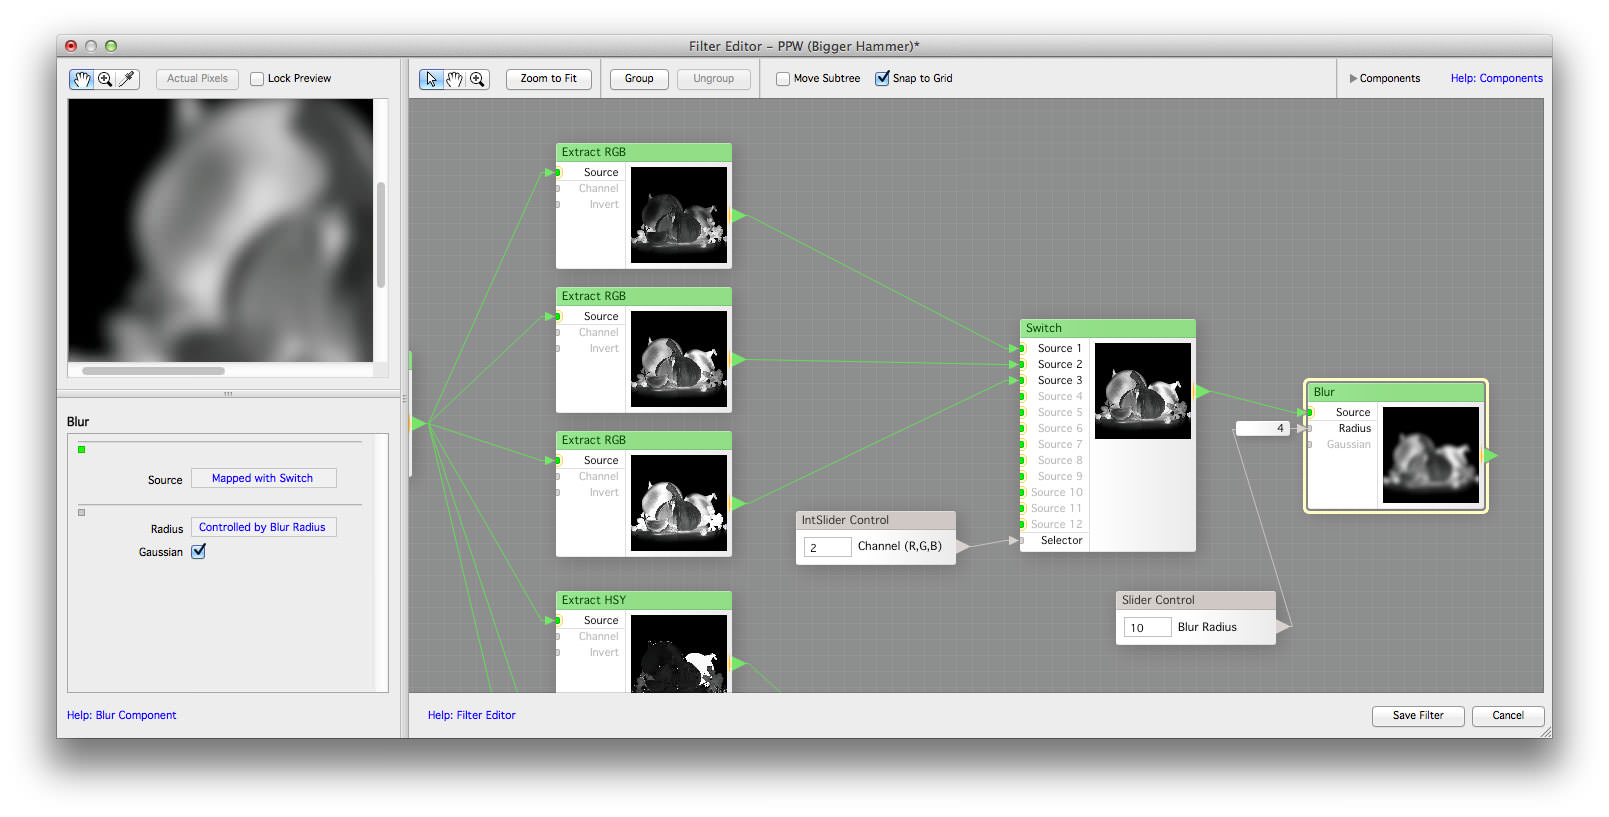
5. Adding the Blur
Under the Processing group you can find built-in components for traditional image processing algorithm, such as Minimum, Maximum, Blend, Blur, High Pass, etc. I’ve added a Blur component with a Slider control, remapping it to a maximum value of 40 (I won’t get into remapping and percent values here). The slider will control the amount of blurring applied to the overlay channel.
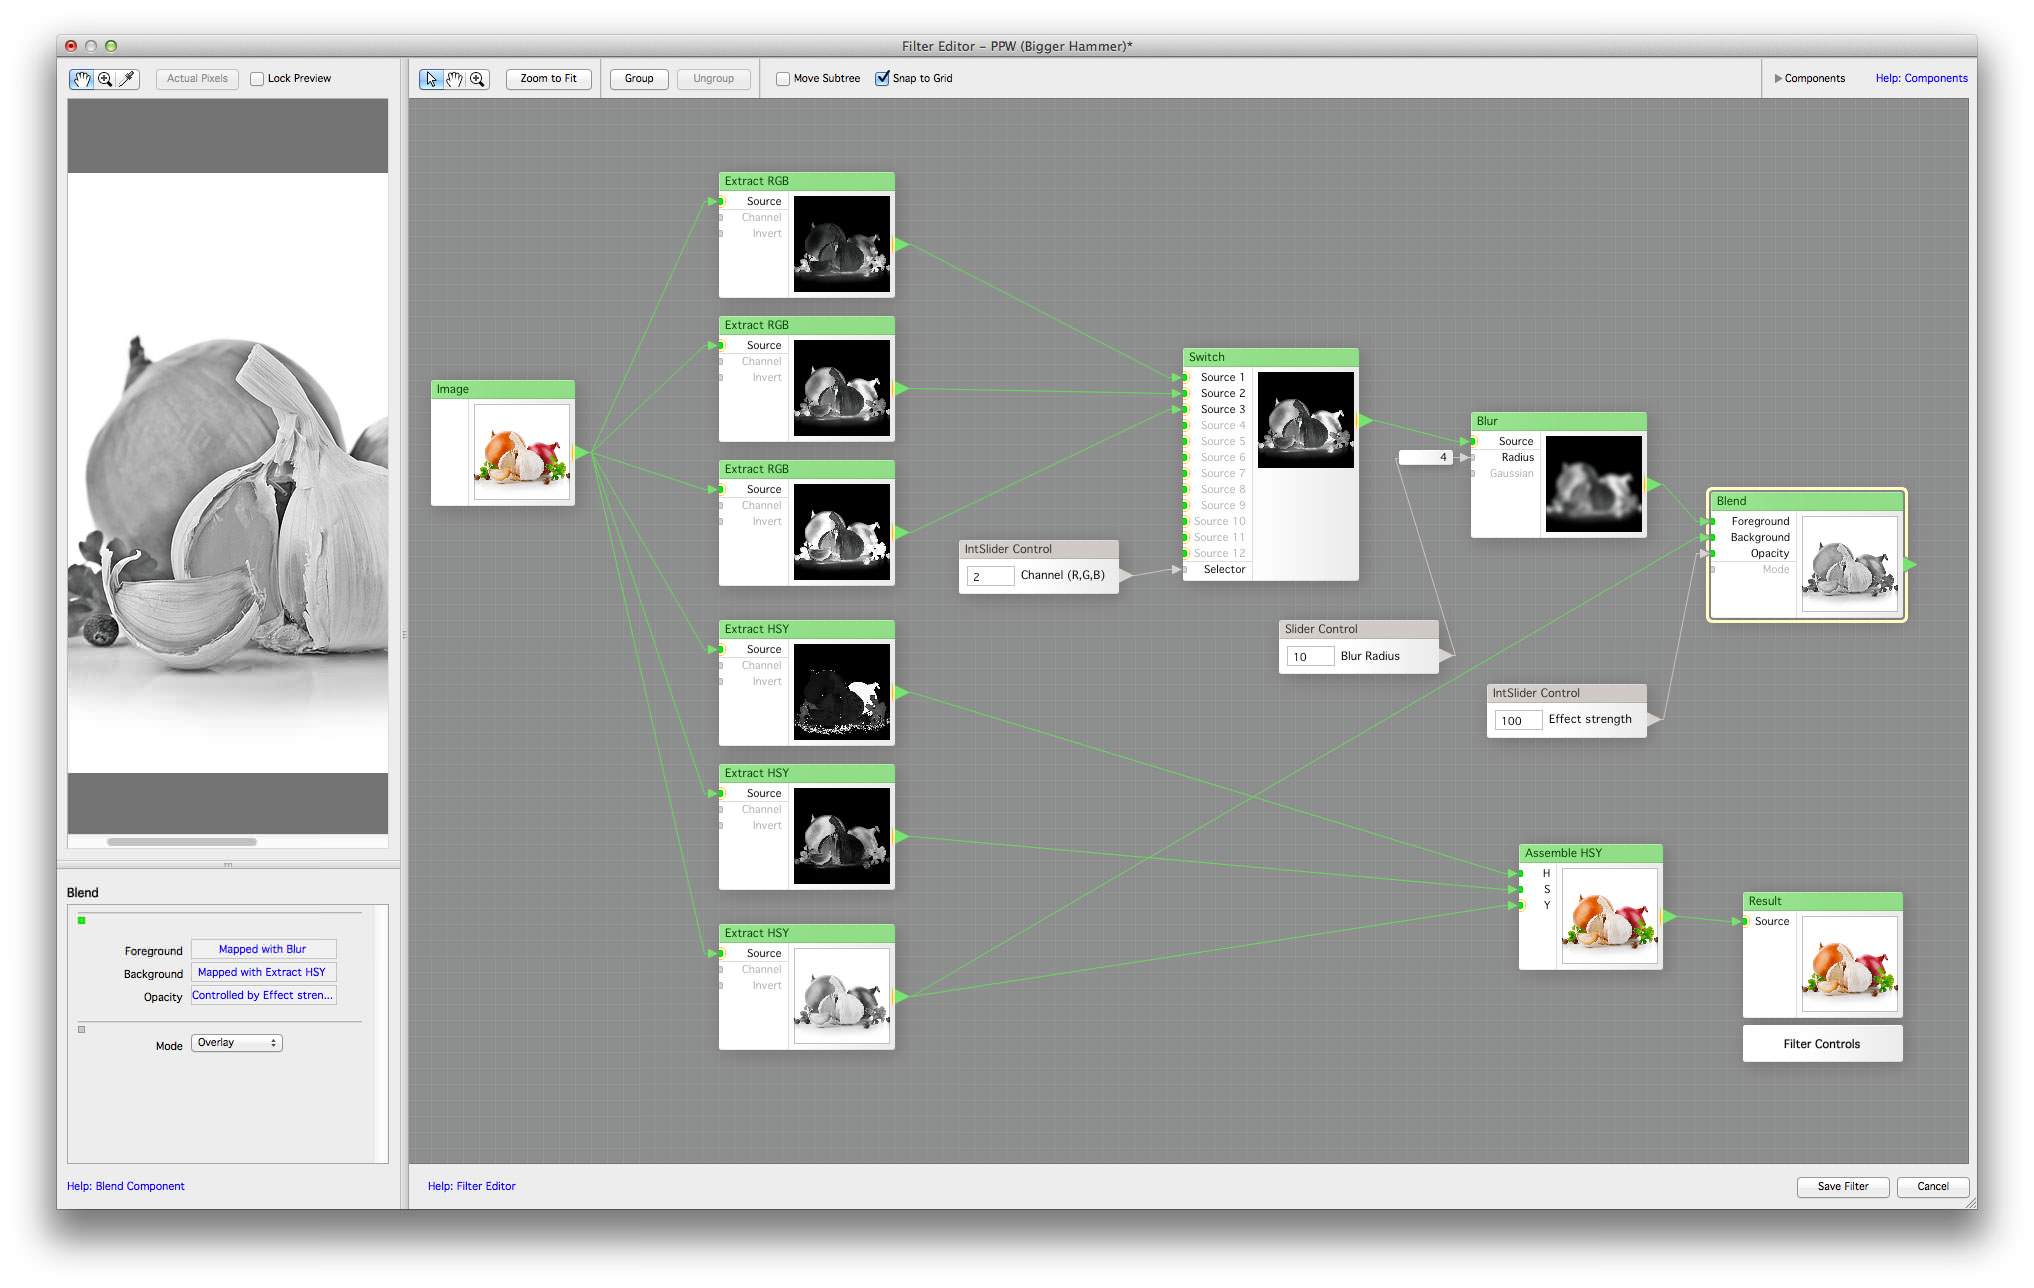
6. Overlay Blend
FF comes with a Blend component that supports common PS blending modes and opacity. I’ve linked the original Y channel (as the background) to the blurred inverted channel (as the foreground), setting the blend to Overlay. Mind you, I’ve added a Slider control to tweak the opacity (that is: the effect’s strength). So far the big picture is as follows:
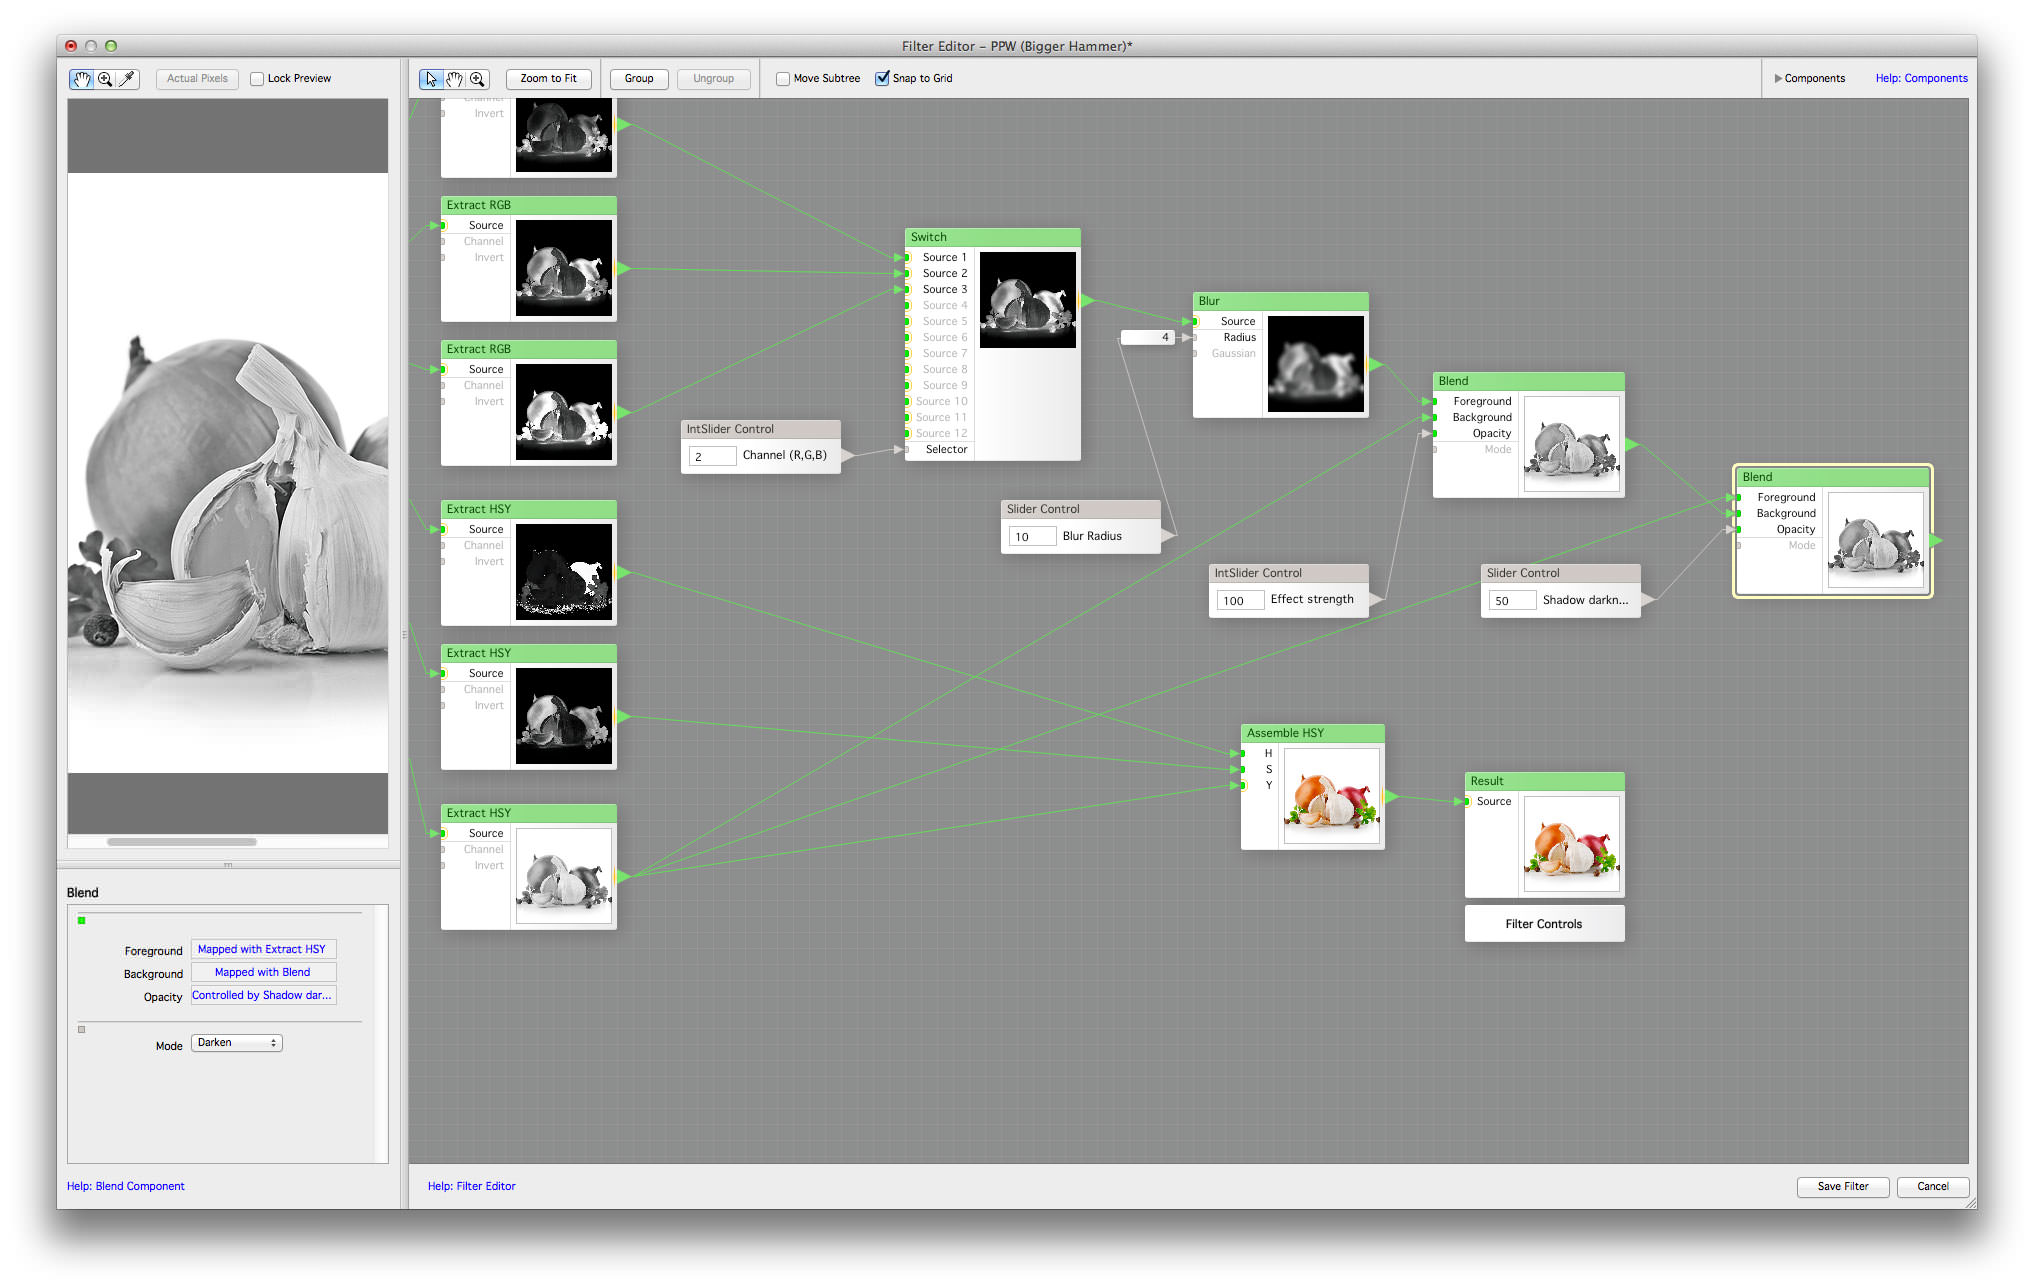
7. Shadow darkness
I’ve added a second Blend, using a second copy of the original Y in Darken (with a Slider controlling the opacity) to mimic the Darkening layer (as in the PS Layers palette screenshot depicts). This time the Y is the foreground, while the result of the overlay blend of the previous step is the Background:
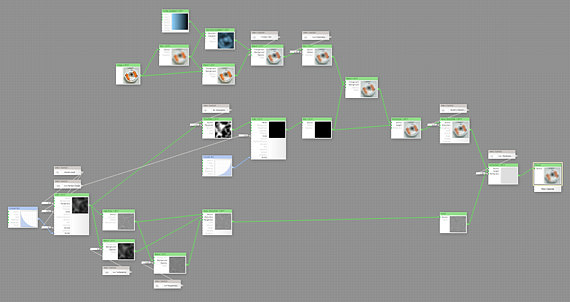
8. Linking the Result
It’s time to un-link the Assemble HSY component from the Y channel coming from the Extract HSY, substituting it with the output of the chain of components ending with the shadow darkness blend. Now the filter is done! The complete pipeline is as follows:
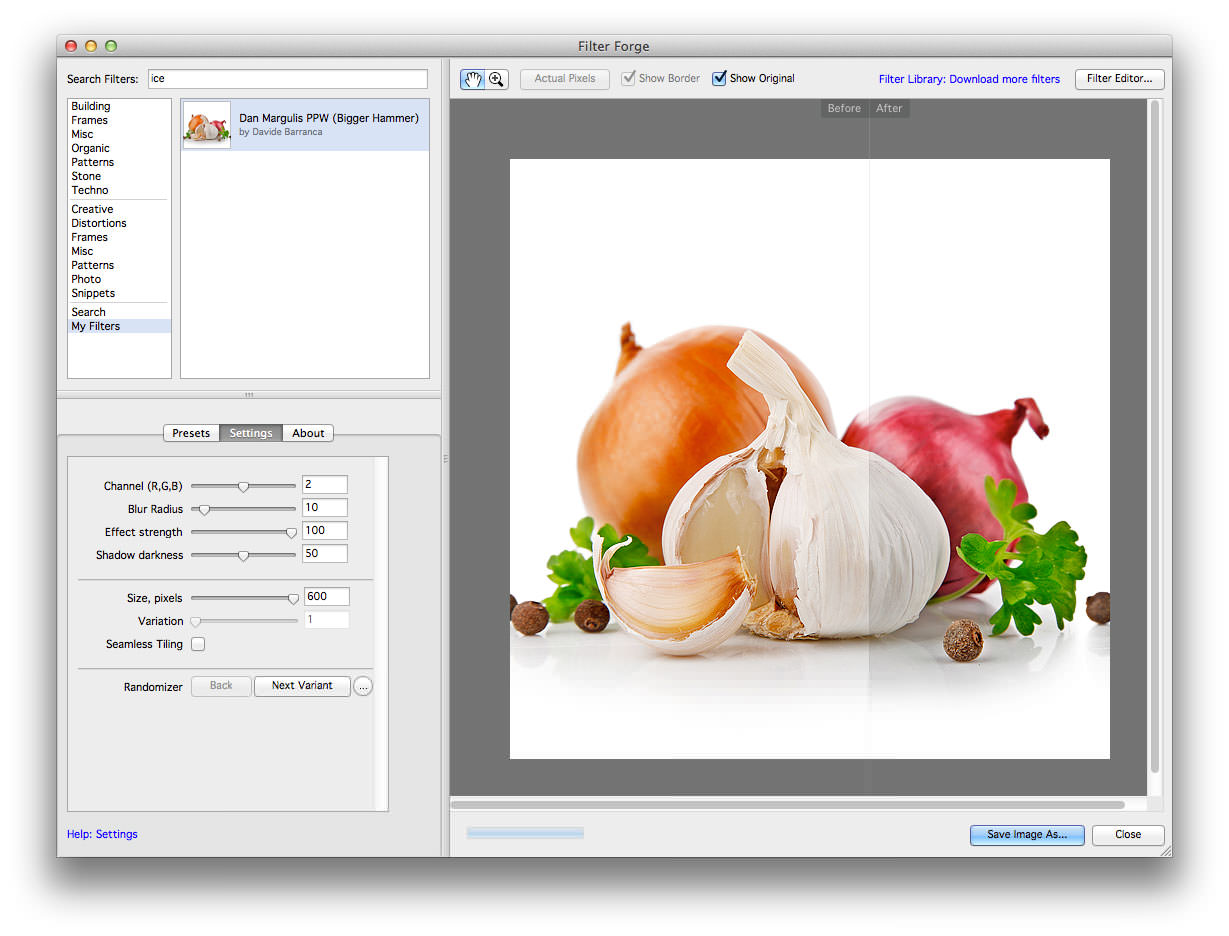
You can now save it as a filter, adding info (such as instruction, author, description) and tags. FF allows you a before/after draggable split view, and the controls I’ve been adding are now automatically gathered in the Settings tab, ready to be modified on the fly:
Conclusions
For instance, I’ve been able to replicate exactly my dear Photoshop Extension ALCE (Advanced Local Contrast Enhancer) and it took me, not kidding, about 5 minutes (which is kind of sad, if I think about all the PS extension development time in Extendscript + Actionscript).
Of course there’s room for improvement (on controls, for instance) – I’m confident that new version will keep advancing. As a developing platform is really amazing. The only actual big flaw (at least it’s a flaw from my own personal point of view) is that Filter Forge business model is build around the idea that the software value is boosted by the huge amount of free resources that come with it – that is, 9.388 filters created by skilled developers from all over the world. Moreover, you can open, study and tweak each one of them – and that’s definitely the better way to learn. Alas this business model collides with the possibility to compile your own filters into a binary form to sell them as standalone PS plugins. That’s not allowed: both for licensing reasons and because that way anyone could just grab one of the 9.388, pack and sell it (not fair, indeed).
It has to be acknowledged that Filter Forge has several interesting rewarding policies towards filters authors and contributors (a credits scoring system they use to assign free licenses) so they pursue their business model coherently – kudos to them!
Please visit Filter Forge for a full list of features, available filters and more!