In this guest post, the Photoshop Plug In developer Scott Murdock tackles the apparently familiar topic of Luminosity Masks – with very interesting findings for anybody using them. Enjoy!
Everywhere you go you read about Luminosity Masks – I’m really surprised it doesn’t have its own Wikipedia Page! (Maybe I’ll take care of that). It is truly a great tool to have in your toolbox, very powerful when used correctly. It’s greatness by simplicity. But how does it works? Not in the sense “how to create it”, but what really happens behind the scenes? Well, let’s try answering that question, and doing it in a deep (and hopefully interesting) way.
The Basics
Step 1 – It all starts with a Grayscale image
You can have images with all the colors in the world, but the first step in creating a Luminosity Mask is getting a Grayscale image (a Single Channel Image). In most cases, it means to calculate the Luminosity Channel of the given image. Each one has his own recipe: most actions/panels based solutions use Photoshop Luminosity selection (Ctrl + Left Mouse Click on the RGB Channel in the Channels Palette).
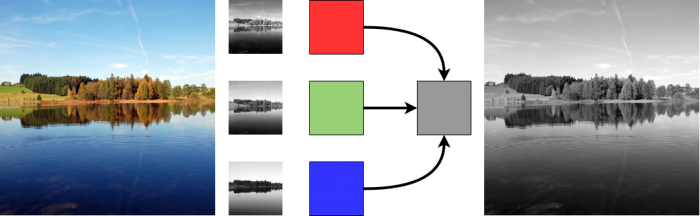
By the way, any “Single Channel” image can do here. The best choice (i.e. Channel, or processed grayscale layer) is the one where the image features you want to select are more evident and easily separable from the rest – in the above example the trees are well distinct from the sky for instance, and the lake’s gradient below helps as well. The Channel of choice could be the Blue from RGB, the Magenta from CMYK, or a combination of all the 10 Channels an image provides (R, G, B, C, M ,Y, K, L, a, b): whatever, be creative. In case of a grayscale image, life is easier, just move over to Step 2.
Step 2 – Apply Pixel Wise Transformation on the Grayscale Image
Now, this is where the magic happens. The idea is very simple: given the Gray Scale image as input, the output per pixel is a function of its value only. Well, this sentence might take some of us back to horrible school days but it is really simple when you think about it. Pixel comes in, states its value, and gets an output value based only on its value alone, and voilà! We have a Luminosity Mask. The name says it all, the Mask depends solely on the Luminosity (Tonal Range value) of the pixels. It has nothing to do with their location, not their surrounding pixels. Just using the Luminosity value. Nothing more, nothing less – power by simplicity.

The above Figure represents a Mask Generator. The input pixels values are in the upper section. They get processed by this black box, which operates based on a function and the pixel output that is generated is found in the bottom section. At the output, everything is black (Low Values) with the exception of pixels around 128, that are mapped to white (High Values). This suggests that a “Midtones Mask” has been generated. Simple fact: images are discrete in their values. For instance, in the case of an 8bit image, the discrete values are in the range {0, 1, …, 254, 255}, occupying 256 available slots, i.e.
So a Mask Generator (Luminosity Mask Generator) has to designate an output value for each value in the input discrete domain. If the output image is also, let’s say 8 Bit, then the output values are also within the range {0, 1, ..., 254, 255} which means one need to map 256 values into 256 values. In the Computer Science world this process is done using a Look Up Table (LUT). Over time some masks got their own naming according to the properties of the values assigned:
- If it designates high output values to low input values, and low values to the rest it is called Shadows Mask Generator. The output mask is called Shadows Luminosity Mask which reveals shadows and blocks everything else.
- If it designates high output values to mid input values, and low values to the rest it is called Midtones Mask Generator. The output mask is called Midtones Luminosity Mask which reveals midtones and blocks everything else.
- If it designates high output values to high input values, and low values to the rest it is called Highlights Mask Generator. The output mask is called Highlights Luminosity Mask which reveals highlights and blocks everything else.
This is the mask generation transformation (aka mapping), and basically this is all theory there is to know.
Examples
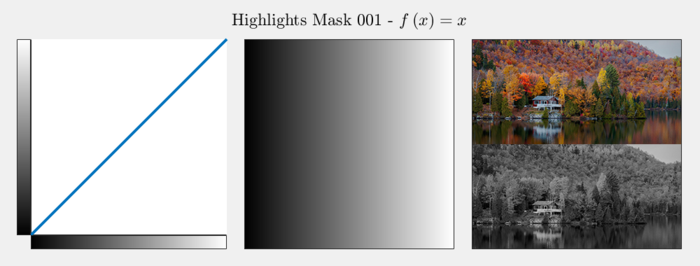
Let’s do some stretching by examining two simple examples of main building blocks in the Luminosity Mask world. We will assume an 8bit image, hence input and output pixel values are given by {0, 1, 2, ..., 254, 255}. The most basic Mapping / LUT / Function (all are different names to the same idea) is the identity mapping:
Namely, the output value – that is – is identical to the input value, which is . This mask is called Highlights Luminosity Mask. Why? Because low input values (Shadows) are mapped to low output values (Dark pixels), and high input values (Highlights) are mapped to high output values (Light pixes). The result is a mask where shadows are dark (not selected) and highlights are light (selected) – hence the name. Another basic mask is given by the negative (inverse) of the Highlights Mask which is the Shadows Luminosity Mask:
Here, to low input values (shadows) correspond high output values, and to high input values correspond high output values (light pixes). The result is a mask where shadows are light (selected) and highlights are dark (not selected). Using those 2 building blocks one could generate many other masks targeting different Tonal Ranges – something we will get to later.

As can be seen above, the Midtones Mask is generated by scaled multiplication of the Highlights Mask and the Shadows Mask. This is one way to achieve this, not necessarily what’s used usually (we’ll talk about that). Moreover, as can be seen by the Harmonic Function, one could do any mapping one wish.
Remark: in practice, data is scaled into [0, 1] range as operations, such as multiplication, makes more sense in that domain. So the range {0, 1, 2, ..., 254, 255} becomes {0 / 255, 1 / 255, 2 /255, ..., 254 / 255, 255 / 255}. This is exactly what’s done in the above figure.
In Practice
So now we know what a Luminosity Mask Generator is, and what it is doing. On the next step, let’s try to understand how this is done in Photoshop in most cases. As discussed above, one need to create a LUT and there are two main approaches doing so: the Calculations Tool or the Curve Tool. One can apply each of those on Grayscale Image and the output is basically a Luminosity Mask.
Curve Tool
The Curve Tool is a LUT table visualized by a Curve. It practically lets the user draw the LUT using a flexible curve.
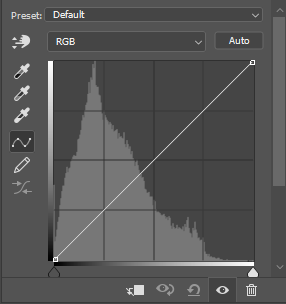
On the figure above, one could see Photoshop’s Curve tool. On its bottom, horizontally, you can see the input values. On the left, vertically, you can see the output value. You match between each value just by altering the curve according to your wish. Basically, school days function, that’s what it is, drawing a function. Luminosity Mask Recipe by Curve Tool
- Create a Grayscale version of the image in a new layer (Extract Luminosity / select one of the channels / desaturate the image / use Channel Mixer, etc…).
- Open the Curve Tool.
- Draw the desired LUT.
- Use the result as a mask -> Luminosity Mask.
Calculations Tool
Using Calculations Tool one could apply simple Math operations on Layer / Channel / etc… Namely we can combine Math operations (Add, Subtract, Multiply and even more esoteric functions) by repetitive use of the Calculation tool. For instance, using the Calculation Tool we could easily generate the Midtones Mask from above by multiplying a layer and its inverse and scaling result by 4. So it gives us the option to use +, –, *, / on images, but not much more than that.
Comparison
Let’s summarize the differences between those 2 approaches:
Curves
- Pros
- No limits what so ever on the shape of the selection.
- Complex mask can be achieved in operation.
- Cons
- Photoshop Curves are quantized into 256 levels which makes them less smooth.
- No parameterization (Unless scripted) hence hard to be accurate and consistent.
- Remarks
- Used by many Luminosity Mask panels out there, yet unless result can be achieved using Calculations, quality wise it is better use Calculations.
Calculations
- Pros
- Can be translated into exact Mathematical expression.
- Smooth result and gets better as the mode (8, 16, 32 Bit) get higher.
- Cons
- Limited to what can be done using the Blend Mode operations on the base Grayscale image.
- Requires repetitive operations to get special selections (Slow).
- Remarks
- Usually used for its quality yet limited either by speed or can get arbitrary selection.
Building Masks
In this part we will show how most of the masks out there are built using the Lego bricks we created.
As one could see above, using Addition, Subtraction and Multiplication (Intersection), all operations available on Layers / Channels / Masks in Photoshop, one could easily generate all those “Classic” Luminosity Masks one could find in the wild (wild world of the Luminosity Masks Panels). Those with sharp eye would pay attention to something strange: Midtones Mask 001 is all black, see the function below:
Yet in practice, in all products out there… It is not?! So what’s going on? Clearly they all state that the Midtones Mask is created by subtracting the Highlights and Shadows masks from the all white mask. So it is, by all means, should be all black mask while it is not. Well, what you see above is ideal Masks, while Photoshop can not generate them in this quality. The current methods to create them usually use Photoshop’s steps which aren’t doing this exact Math. We’ll talk more on those pitfalls and strange behavior of classic Luminosity Masks (and their generation) in the next writing.
Summary
- Now we’ve understood what Luminosity Masks really are, the actual operations and Math behind them.
- We have shown the Luminosity Mask generation is no more than the most simple operation on grayscale image - Apply LUT / Pixel Wise Mapping.
- What we saw is that there 2 main approaches for Luminosity Masks in Photoshop. While one gives the most flexibility and efficiency (Curve Tool) it lacks with quality and the other which generates smooth masks (Calculation Tool) has speed issues when trying to generate complex masks and some miss calculations in the process.
How can we solve those? Well, do the algorithm outside the limitations of Photoshop. This is what Fixel Zone Selector is all about. In the next part we’ll have a deeper dive and talk about Zone Selector’s approach to Luminosity Masks.
Image Credit
- Lighthouse Image - Credit to magnetismus.
- Schwaigsee Lake - Credit to Alfred Borchard.
- Simple Living - Credit to Malcolm Carlaw.
Resources
- Luminosity Mask: The Complete Kickstarter’s Guide (video).
- How to Generate the Classic Luminosity Masks Using Mask / Channel Operations (Add, Subtract, Intersect Multiply) (video).
- How to Generate the Classic Luminosity Masks Using Calculations (16 Bit Mode).
- Selecting Using Luminosity Masks (Using Curve Tool) (video).
Author of this guest post: Scott Murdock.