When developing HTML Panels, I’m always quite fanatic about code privacy: for a variety of reasons, I don’t want users to peek into my files. Lately, I’ve found particularly effective the obfuscation provided by javascriptobfuscator.com – which, surprisingly, works equally fine with both JavaScript and ExtendScript.
Their paid tier offers the possibility to access it through HTTP – a good candidate for Gulp automation. Since there’s no ready-made plugin available on the internet, I’ve ventured into building one; which I’m going to share with you in this post. Before going into the technical details of Gulp plugins, let me recap very briefly my point of view on code privacy.
- HTML Panels should protect both JS and JSX, and JSX is known to be particularly resistant to aggressive minification and/or obfuscation.
- To my experience, free obfuscation services are not that much reliable: even the apparently ugliest result can be automatically beautified in such a way that at least part of the code logic is exposed. Moreover, some of them are known to inject malicious code in the process.
- I’ve evaluated two or three different options, and I’ve finally chosen the one I’ll talk about. I’m not sponsored in any way – alas :-)
- No, JSXBIN isn’t as secure as it was in the past.
Please note that I’ll assume Gulp knowledge – I’ve already written about it here, please check that if you find yourself lost. That said, let’s see the example code they provide on this page, that I’ll use as a starting point – it’s the Javascript Obfuscator API Example Project (HTTP + JSON API). The following is found in a script tag of an html page.
var proj = {};

proj.APIKey = ""; // <- your API Key
proj.APIPwd = ""; // <- your API Password
proj.Name = "Sample1";
proj.ReplaceNames = true;

// for more parameters of the proj object , please reference
// http://service.javascriptobfuscator.com/httpapi.asmx?WSDL

var item0 = new Object();
item0.FileName = "test0.js";
item0.FileCode = "function hello(x,y){var z=11;return x+y+z;}";

var item1 = new Object();
item1.FileName = "test1.js";
item1.FileCode = "var strs=['aaaa','bbbb','cccc','dddd','eeee','abcdefghijklmnopqrstuvwxyz0123456789']";

proj.Items = [item0, item1];

var url = "https://service.javascriptobfuscator.com/HttpApi.ashx";

var xhr = new XMLHttpRequest();
xhr.open("POST", url, false);
xhr.setRequestHeader("Content-Type", "text/json");
xhr.send(JSON.stringify(proj));

if (xhr.status != 200) {
  alert("Http Error :" + xhr.status + "\r\n" + xhr.responseText);
} else {
  var result = JSON.parse(xhr.responseText);
  if (result.Type != "Succeed") {
    alert(" ERROR : " + result.Type + ":" + result.ErrorCode + ":" + result.Message);
  } else {
    for (var i = 0; i < result.Items.length; i++) {
      var div = document.createElement("DIV");
      div.style.cssText = "margin:12px;border-bottom:solid 1px gray;";
      div.innerText = result.Items[i].FileCode;
      document.body.appendChild(div);
    }
  }
}
Let’s inspect this. First, you need your API Key and API Password, that you can find in your JavascriptObfuscator dashboard, as soon as you’ve subscribed to one of the paid tiers. A proj object is created, and some properties assigned: your API data, the project name, and a series of parameters that will drive the obfuscation process. In this case, ReplaceName set to true (line 6). In the same call, you can send for processing more that one single file: they must be wrapped with an object (here item0 and item1), which actual code is found in the FileCode property (lines 11-17).
Then they’re both stored into an array that is assigned to the proj.Items property. Next, a standard XMLHttpRequest of type POST is sent, passing the stringified proj object (line 26). The response is then showed in a couple of div elements in the page. Enough for this example. The kind of API that I’d like to consume in my real code is as follows – this comes directly, yet slightly simplified, from my gulpfile.js
var gulp = require('gulp'),
    jso  = require('./jsobfuscator');

// several previous tasks here...

gulp.task('jso', function() {
  return gulp.src([
    'src/app/jsx/photoshop.jsx',
    'src/app/app.js',
  ], { base: './src/' })
  .pipe(jso())
  .pipe(gulp.dest("dist"))
});
I’m passing two files in the source array – the ones I’m interested in deep obfuscating: the main application JS, and the only JSX of the Panel. The processed result is going to be saved in the dist folder, keeping the same directories structure. As you see, I’m requiring './jsobfuscator': this means that I’ve created in the root folder a jsobfuscator.js file, which contains my actual Gulp plugin. The entire code is as follows, read along for a walkthrough.
| var http = require('http'), | |
| fs = require('fs'), | |
| Readable = require('stream').Readable, | |
| through = require('through2'), | |
| gutil = require('gulp-util'), | |
| Vinyl = require('vinyl'); | |
| module.exports = function() { | |
| var transform = function(file, encoding, callback) { | |
| if (file.isNull()) { | |
| return callback(null, file) | |
| } | |
| var that = this; | |
| var proj = {}; | |
| proj.APIKey = "/* Your API Key */"; | |
| proj.APIPwd = "/* Your API Password */"; | |
| proj.Name = "My Project"; | |
| proj.ReorderCode = true; | |
| proj.ReplaceNames = true; | |
| proj.EncodeStrings = true; | |
| proj.MoveStrings = true; | |
| proj.MoveMembers = true; | |
| proj.DeepObfuscate = true; | |
| proj.SelfCompression = true; | |
| proj.CompressionRatio = "Auto"; | |
| proj.OptimizationMode = "Auto"; | |
| var appJS = new Object(); | |
| appJS.FileName = "app.js"; | |
| appJS.FileCode = file.contents.toString('utf8'); | |
| proj.Items = [appJS]; | |
| var postData = JSON.stringify(proj); | |
| // gutil.log ("Lenght: " + Buffer.byteLength(postData, 'utf-8')) | |
| var options = { | |
| host: 'service.javascriptobfuscator.com', | |
| path: '/HttpApi.ashx', | |
| method: 'POST', | |
| headers: { | |
| 'Content-Type': 'text/json', | |
| 'Content-Length': Buffer.byteLength(postData, 'utf-8') | |
| } | |
| }; | |
| postCallback = function(response) { | |
| response.setEncoding('utf8'); | |
| var str = ''; | |
| response.on('data', function(chunk) { | |
| str += chunk; | |
| }); | |
| response.on('end', function() { | |
| // gutil.log(JSON.stringify(JSON.parse(str), null, ' ')); | |
| var resObj = JSON.parse(str); | |
| var fileStream = new Readable(); | |
| fileStream.push(resObj.Items[0].FileCode); | |
| fileStream.push(null); | |
| var jsFile = new Vinyl({ | |
| cwd: file.cwd, | |
| base: file.base, | |
| path: file.path, | |
| contents: fileStream | |
| }); | |
| that.push(jsFile); | |
| callback(); | |
| }); | |
| } | |
| var req = http.request(options, postCallback); | |
| req.write(postData); | |
| req.end(); | |
| }; | |
| return through.obj(transform); | |
| }; |
Before going any further, check this Writing a Gulp Plugin documentation page as a way to orient yourself: I’ll point out the main problems I’ve run into as a total Gulp plugins beginner, that I’ve been able to solve after a good deal of head scratching time. First, you need to require some modules: the native fs, stream, and http, plus through2, gulp-util, and vinyl – install them:
npm install --save-dev through2 vinyl gulp-utilI’m exporting a single function, that returns (line 84) the transform function passed through the through.obj() method: this is the way a Gulp plugin works.
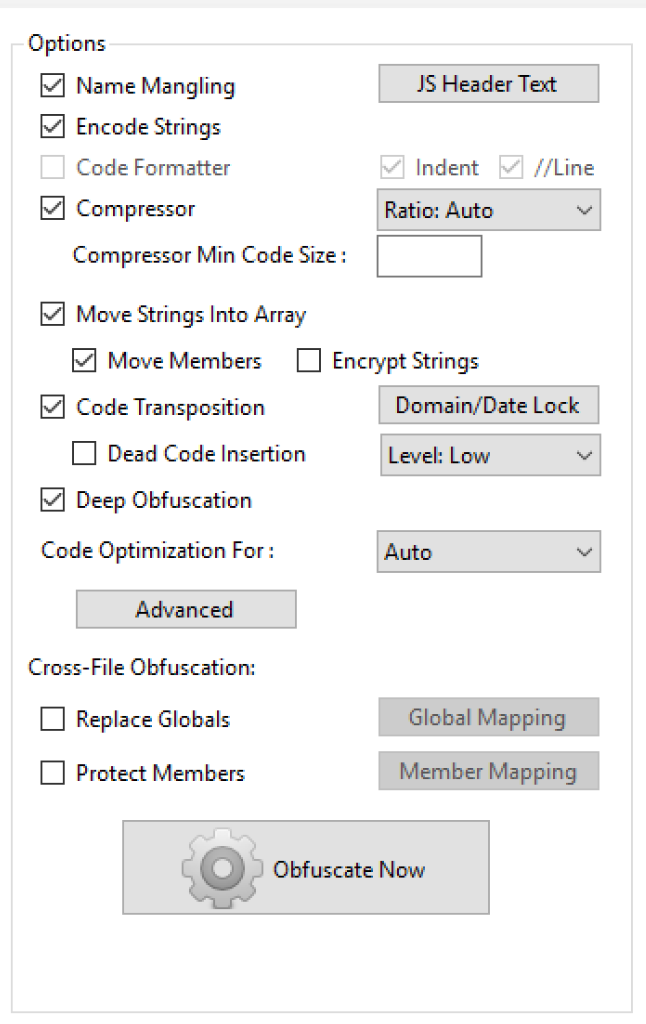
The transform function (line 10) is exactly where everything happens. I’ve recreated there the proj object you’ve seen in the demo file, passing a lot more parameters. These ones (lines 21-29, like MoveStrings, DeepObfuscate, etc.) should mimic the setup illustrated in the screenshot at right, that comes from the JavascriptObfuscator Windows-only GUI.
That’s what you’re allowed to set with a Basic membership ($19 per month). I’m not 100% sure I’ve been able to replicate everything: if you have a better understanding of the parameters, please let me know in the comments. Next, I’ve created the wrapper object (appJS, line 31) that will contain the plain code to be obfuscated: please note that the FileCode property this time can’t be just equal to file, which is a peculiar object called Vinyl File – what your Plugin should receive and, eventually, return. Instead, you’re interested into the contents prop of the Vinyl File, which happens to be a Buffer: so you need to stringify it, passing the correct encoding ('utf8').
At line 35, appJS is inserted in the proj.Items array; I’m then creating a postData variable, that holds the String I’ll eventually need to POST to the JavascriptObfuscator server – the stringified version of the entire proj object. Line 41-49, the options object will be needed in the request at line 80: I have to specify the host (no prepended https), path, method, and headers. Without 'Content-Type' and 'Content-Length' (see this StackOverflow thread for the Buffer.byteLength() method used to calculate the latter) the request will fail. Line 49, postCallback is called when the request is dispatched.
As soon as data is coming, i.e. response.on('data'), a string is formed. When the response is terminated, i.e. response.on('end'), I’m parsing the received JSON string into an object (line 62). If you want to log it – or log anything to debug your code – use the gutil.log() function, that you can find in the code comments here and there. The horribly, properly obfuscated string is found in the resObj.Items[0].FileCode prop, hurray! The only problem is, as I’ve mentioned earlier, that your Gulp plugin needs to return a Vinyl File. Hence, a brand new Vinyl File called jsFile is created (line 66) using current working directory, base, and path from the original file. What about the contents? You cannot stick in there the resObj.Items[0].FileCode String, because contents must be a Stream. Thanks to the holy StackOverflow, I’ve learned that a Readable (line 64) can turn String into Stream, and I’m a happy camper now.
Last but not least, this Vinyl file must be pushed down the line, for the Gulp Plugin to work. Was I not into a callback, nested in a function, which in turn is nested into the main transform function, I would have used this.push(jsFile). But I happen to be at a location where this is not what it used to be: that’s the why I’ve stored it (line 15) into the that variable. So that.push(jsFile), line 75. At the very end, you need to run the transform’s callback (line 76), and you can call quit.
The above took me more than a full day of work to figure out… It’s been a self-taught crash course on Gulp Plugins – worth sharing to you and my future self when I’ll have forgotten every juicy detail of it; in about… a couple of months maybe? There is plenty of room for improvement – I would have liked to merge multiple source files not into a single file, but into a single http request: splitting the various input files into several elements of the proj.Items array. Yet, I have no idea how to do so (suggestions in the comments are welcome!). Error checking is completely missing, and so on and so forth. Rough as it is, it works; and every second saved from manual labor is worth the effort, isn’t it?
The Photoshop HTML Panels Development Course
If you’re reading here, you might be interested in my Photoshop Panels development – so let me inform you that I’ve authored a full course:
- 300 pages PDF
- 3 hours of HD screencasts
- 28 custom Panels with commented code
Check it out! Please help me spread the news – I’ll be able to keep producing more exclusive content on this blog. Thank you!