While there is a more user friendly app such as Adobe Packager which is a great simple app for simple needs, I will show you how to custom build ZXP installers for:
- HTML Extensions
- Bundled Flash + HTML Extensions
- Hybrid Extensions (Panel + Plug-ins / Assets, etc)
using the ZXPSignCmd, the ucf.jar command line tools, and custom MXI files. As a primer on Extension installers, you must know that:
- in order to deploy your products (either Panels, Scripts but also assets such as Brushes, Textures, etc) you have to build a ZXP package - to be submitted to Adobe Add-ons (the Adobe Exchange web store) or distributed in other ways.
- ZXP must be signed with either a Paid Certificate (see a list of supported providers) or a free, Self-Signed certificate.
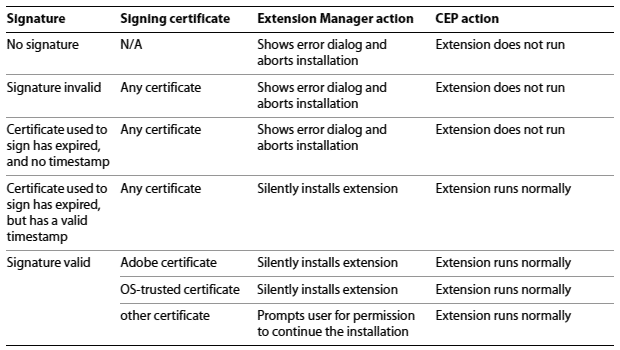
- ZXP must be timestamped. You can avoid it if you plan to sell your own stuff directly, but for some good reasons I strongly suggest you to timestamp. A table showing various scenarios is as follows:
More info and resources links below, so let’s start diving.
1. Create a Certificate
First, grab the CC Extensions Signing Toolkit, that is to say the ZXPSignCmd executable file. Myself, I will go with a free, self-signed certificate: Adobe Extension Manager will fire a couple of warning popups, but Adobe Add-ons is perfectly fine with it and won’t complain. So: fire the Terminal (or the Win Command line), get to the directory where you’ve moved the ZXPSignCmd file (if you don’t know how to do this, just type “cd “ - mind you there’s a space - in the terminal and drag and drop the folder, then hit Enter) and create a certificate using this pattern:
ZXPSignCmd -selfSignedCert <countryCode> <stateOrProvince> <organization> <commonName> <password> <outputPath.p12>An actual example with fake data can be:
./ZXPSignCmd -selfSignedCert IT BO DBCompany "Davide Barranca" OcaMorta selfDB.p12Mind you, ./ at the beginning instructs the shell to look for the executable in the current directory. If everything went OK you should find a newly created selfDB.p12. That’s your self signed cert.
2. Pack and Sign an HTML Extension
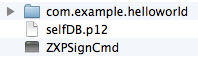
Let’s assume the extension you’ve made has the ID com.example.helloworld and it’s contained within a directory named accordingly. Gather together the Extension with the ZXPSignCmd and the selfDB.p12 in one folder, then build the ZXP using this pattern:
ZXPSignCmd -sign <inputDirectory> <outputZxp> <p12> <p12Password> -tsa <timestampURL>Which in our example (I’ve put a fake password too) translates in:
./ZXPSignCmd -sign com.example.helloworld com.example.helloworld.zxp selfDB.p12 OcaMorta -tsa https://timestamp.geotrust.com/tsaIf everything’s OK you should find a newly created com.example.helloworld.zxp file. That’s your self signed, timestamped installer; submit it to the Add Ons website and/or privately and enjoy.
3. Pack and Sign HTML + Flash Extensions
Here comes the fun. I assume you have (for the same product) already coded and packed an HTML version, plus the Flash version, so you have:
com.example.helloworld.zxp(HTML version, packed and signed as shown above)com.example.helloworld.zxp(Flash version, packed and signed with Flash Builder 4.5 as we used to do back in the Flex days)
Mind you, I use IDs for the ZXP names because in the past Adobe Exchange was a bit picky in that regard - so it’s not just hello.zxp. I don’t know whether things have changed now, try and let me know.
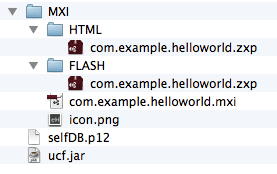
Please grab the ucf.jar command line tool and arrange things in the way shown in the screenshot at right. That is to say, put into a folder:
- the
selfDB.p12 - the
ucf.jar - a 46x46px icon.png (to be used as the icon in Extension Manager)
- a new MXI folder. Inside the MXI there’s:
- an HTML folder containing the HTML panel ZXP installer,
- a FLASH folder containing the Flash panel ZXP installer,
- a MXI file, which I’m going to talk about right now.
MXI file
Basically it’s an XML file containing instruction for the files deployment and lots of metadata. Please refer to this Extension Manager CC Configuration File Reference for extra info and best practices. As follows the MXI needed to correctly deploy both Flash and HTML extensions. Mind you, PS CS6 (13.x) and current CC (14.x) are supporting Flash, while HTML is for Photoshop-next (which I assume that is going to be 15).
<?xml version="1.0" encoding="UTF-8"?>
<macromedia-extension
  id="com.example.helloworld"
  icon="icon.png"
  name="Hello World"
  requires-restart="true"
  version="1.0.0">

  <author name="Davide Barranca"/>

  <description href="http://www.davidebarranca.com">
    <![CDATA[Here goes the extension description]]>
  </description>

   <ui-access>
    <![CDATA[Here you tell the user where she will find your product (in the Window - Extensions menu, or elsewhere)]]>
  </ui-access>

  <license-agreement>
    <![CDATA[Here goes the EULA]]>
  </license-agreement>

  <products>
    <product familyname="Photoshop" version="13"/>
  </products>

  <files>
    <!-- The HTML panel, for 15.0 onwards -->
    <file source="HTML/com.example.helloworld.zxp"
        destination=""
        file-type="CSXS"
        products="Photoshop,Photoshop32,Photoshop64"
        minVersion="15.0" />

    <!-- The FLASH panel, for 13.0 to 14.9 -->
    <file source="FLASH/com.example.helloworld.zxp"
        destination=""
        file-type="CSXS"
        products="Photoshop,Photoshop32,Photoshop64"
        minVersion="13.0" maxVersion="14.9" />

    <!-- Extension Manager icon -->
    <file source="icon.png" destination="$ExtensionSpecificEMStore" />
  </files>
</macromedia-extension>
Couple of things to notice:
- In the
producttag, the version is actually the minimum version supported. - When the
file-type="CSXS"there’s no need to specify the destination.
Now, fire the Terminal and:
java -jar ucf.jar -package -storetype PKCS12 -keystore ./selfDB.p12 -tsa http://timestamp.entrust.net/TSS/JavaHttpTS com.sample.helloworld.zxp -C "./MXI/" .It will ask you for the p12 password, and eventually the com.sample.helloworld.zxp file is built. Some other notes:
- You might need to download Java from Oracle
- I’ve changed the timestamp url (that’s another option)
- There’s a final dot you have to keep!
You may ask why the ucf.jar and not ZXPSignCmd: the reason is that, in order to be CS6 compatible, ucf.jar is the tool of choice.
4. Pack and Sign Hybrid Extensions

Hybrid extensions let you install extra content, which can be platform (Mac/Win) and/or version (CS6/CC) and/or bit version (32/64bit) targeted: either Plugins, PDFs, etc. In fact the Flash+HTML extension above qualifies as an Hybrid extension too. In this example I will bundle a lot of extra content - keep in mind that all the paths are relative to the MXI file location. For the completeness sake, I will then use the ZXPSignCmd since we will pretend that this one is a CC only Extension.
<files>
<!-- The HTML panel, for 15.0 onwards -->
<file source="HTML-cs-extensions/com.example.helloworld.zxp"
      destination=""
      file-type="CSXS"
      products="Photoshop,Photoshop32,Photoshop64"
      minVersion="15.0" />

<!-- the entire DOCS/ folder content -->
<file source="DOCS/"
      destination="$userhomefolder/Documents/HelloWorld_DOCS/"
      file-type="ordinary"
      products="Photoshop,Photoshop32,Photoshop64" />

<!-- JSX file goes in the Photoshop/Presets/Scripts folder -->
<file source="SCRIPTS/"
      destination="$scripts/HelloWorldFolder"
      file-type="ordinary"
      products="Photoshop,Photoshop32,Photoshop64" />

<!-- MAC plugin -->
<file source="MAC/"
      destination="$pluginsfolder/HelloWorldFolder"
      file-type="ordinary"
      products="Photoshop,Photoshop32,Photoshop64"
      platform="mac"/>

<!-- WIN plugin, 64bit -->
<file source="WIN/"
      destination="$pluginsfolder/HelloWorldFolder"
      file-type="ordinary"
      products="Photoshop,Photoshop64"
      platform="win"/>

<!-- WIN plugin, 32bit -->
<file source="WIN/"
      destination="$pluginsfolder/HelloWorldFolder"
      file-type="ordinary"
      products="Photoshop,Photoshop64"
      platform="win"/>

<!-- Extension Manager icon -->
<file source="icon.png"
      destination="$ExtensionSpecificEMStore" />
</files>
Then you have to fire the Terminal and as usual:
./ZXPSignCmd -sign MXI com.sample.helloworld.zxp selfDB.p12 OcaMorta -tsa https://timestamp.geotrust.com/tsaThat should hopefully create a ZXP, deploying:
- The HTML Panel
- General assets (in my case a PDF and an HTML file) in a User’s Home subfolder
- C/C++ Plugins (targeting Mac/Win versions, 32 and 64 bits)
- JSX Scripts in the Photoshop CC/Presets/Scripts custom named subfolder
Please refer to this page for a description of General and Product Specific Path Tokens.
Resources
This brief guide is far from being exhaustive - I’ve only described things that I know first hand. For a better understanding of the topic, please refer to the following official documentation:
- ZXPSignCmd download
- ZXPSignCmd - Instruction
- ZXPSignCmd - Packaging and Signing Technical Note
- ucf.jar download
- ucf.jar - Packaging instructions
- ucf.jar - Technical Note (see from pag. 23 onwards)
- MXI Reference (with path tokens, etc)
- EULA Template
The Photoshop HTML Panels Development Course

If you’re reading here, you might be interested in my Photoshop Panels development – so let me inform you that I’ve authored a full course:
- 300 pages PDF
- 3 hours of HD screencasts
- 28 custom Panels with commented code
Check it out! Please help me spread the news – I’ll be able to keep producing more exclusive content on this blog. Thank you!