Double USM is a brand new Sharpening script for Photoshop; in this third post of the series I’ll show you examples for traditional sharpening, HiRaLoAm (High Radius Low Amount) and mixed sharpening.
UPDATE
</p>
This is a 3 part series on the Double USM Photoshop plugin.
Even if the version used in this article is older than the current one, the sharpening concepts still apply! Find the new version announcement here
- Introduction (sharpening basics, Double USM)
- Features (interface, functionality and Batch processing)
- Examples (case studies) <- you’re here!
Double USM v2 is available for sale on my website CC-Extensions. </div> </div>
Warning!
If you’re not familiar with Sharpening or want to recap the basics, I’ve covered the topic extensively here. We’re going to explore three kind of sharpening you can apply with Double USM: traditional (fine detail), HiRaLoAm (shape and 3D look), mixed (a combination of the former ones). I’m going to show an example for each case, but there’s of course a lot of room for your personal experimentation, which I strongly encourage (you can read a step-by-step Sharpening Case Study I’ve published some time ago as an example of a possible advanced application).
 Mind you: I’ll be a bit heavy-handed in the examples – I’d like you to spot halos easily; moreover, we’ll be studying not only “how much” sharpening to apply (which can be a matter of taste), but specifically “which kind“. That is to say, the Dark / Light Halos ratios, both in terms of Amount and Radius. Don’t mind too much absolute values (why 345% Amount and not 350%?), but instead think to the relation between Dark and Light sharpening, this way: Light Halos are, say, one third smaller (Radius) and a half weaker (Amount) than Dark Halos.
I’m interested in finding the “right kind” of sharpening; as once my Maestro Dan Margulis during one of is italian trip said “one liter of Grappa is too much of a good idea”, so if you think it’s over-sharpened, just reduce the opacity of the layer to your taste and it’ll be OK.
Traditional Sharpening
This is what we’re mostly used to: high frequency detail boosting (i.e. small features and borders). Standard sharpening values include high Amounts (up to 500% if you’re heavy-handed) and low Radii (it depends on the image size and the output – display, print/press – but we talk about values ranging from 0.2/0.4px for the web, up to about 2.0px or more). Threshold is really up to you, and must be evaluate on each picture: sometimes you’d be better off masking the sharpening level with some kind of luminosity mask or border mask, instead to tweaking the Threshold.
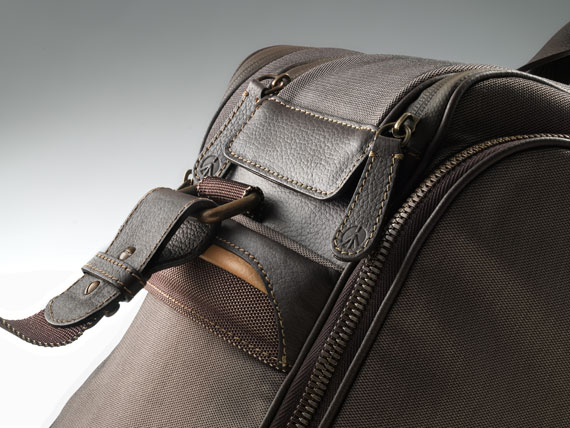
Still-life shot of a Manfrotto leather photo bag by Roberto Bigano
This first picture comes as a pretty high resolution file – it’s been captured using an Hasselblad 528 Multi Shot (four shots recording real non-interpolated color) with a HC4-120 Macro lens.
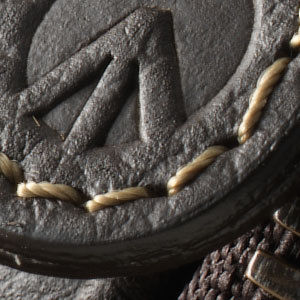
Roberto masters a particular technique called Focus Stacking (that is, he takes several multi-shot captures focusing at progressively distant planes, then blends the files into a amazingly detailed picture). Anyway, at left there is a 100% crop of a detail so you can get the idea of the image size and quality. I’m going to downsample the file to 50% so that the values refers to a picture sized: 2720 x 2040 px. Let’s pretend we need to sharpen it for a printed ad.
We can easily predict that a traditional sharpening (high Amount, Low Radius would emphasize too much the fabric texture, which highlights are going to “eat” detail, resulting in a polka-dots-like white noise, a bad scenario. On the other hand, sheet-fed presses and high quality coated papers can stand quite a bit of sharpening, so we’d like to boost the existing detail – it’s a finely crafted technical product after all, and the texture should be prominent in my personal opinion.
So, as follows there’s a comparison between the original file, the Photoshop’s UnSharp Mask filter (Amount 300%, Radius 1.5px) and the Double USM default (which Dark Halos are the very same 300% and 1.5px, but Light Halos are 50% thinner and 50% weaker – that is to say: Amount 150% and Radius 0.7)
HiRaLoAm
This is how Dan Margulis first called a sharpening applied with High Radius, Low Amount (the reverse of traditional sharpening). Instead of enhancing high fine detail, a high Radius (in the range of about 15/50px or more, depending on the image size and the subject’s features) affects wider frequencies and basically shapes the subject: it makes it appear more three-dimensional.
We’ll be using the following image, a Texas Tea hybrid rose (see the caption for full details – the original file is about 4400x3600px).
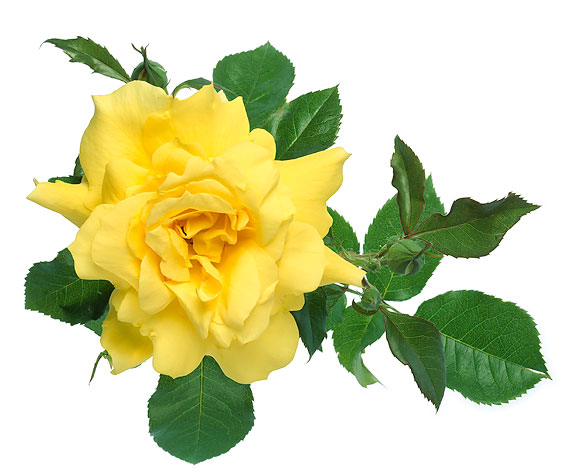
Plaublel 4×5 camera with Sinar Vario film holder and Schneider Symmar Macro 180 lens.
Fujichrome Velvia50 6x7cm, scanner Hasselblad Flextight X5 – © Roberto Bigano
If you’re not familiar with HiRaLoAm, practice with it this way:
- Open a picture and duplicate the background layer (precautionary measure).
- Run Photoshop’s own UnSharp Mask filter and pump up the Amount slider to the max (500%), leave Threshold alone and start raising the Radius up to very large numbers (say 15, 35, 70 pixels or more).
Oh yes, the picture looks like crap but it’s OK:
Testing high Radii at crazy Amount – just to assess the right Radius for HiRaLoAm
You see that, even though the Amount is absurd, HiRaLoAm shapes the yellow rose’s volume – which Radius does the job best in your opinion?
(I haven’t bothered to fade the UnSharp Mask filter to Luminosity with “Edit -> Fade…” menu item – in order to avoid chromatic aberration as you see – we don’t care about them now)
- Tweak Threshold if necessary, to suppress noise in areas where it may be a problem.
- Finally, reduce Amount to pleasing levels – something like 30% up to 70% (again, these are just suggested values).
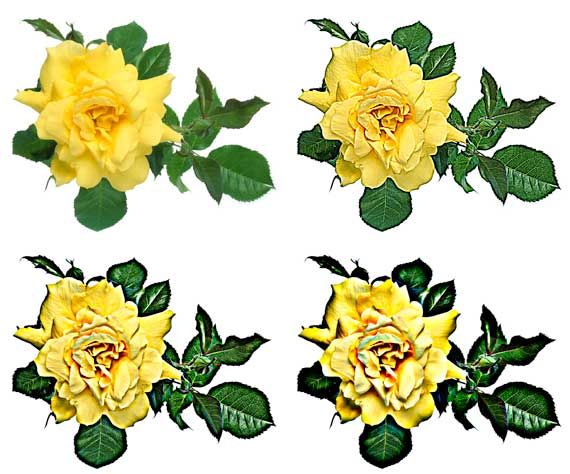
Double USM has the power to let you control both Light and Dark shaping Halos separately (Amount and Radius), so you’ve unprecedented control on the 3D effect you’re after. Please see in the following comparison the original image, Dark Halos only (available in Double USM checking the Dark preview radio-button), Light Halos only (ibid.) and the combination of Double USM Dark + Light Halos (the final result).
Applied values on the original sized image are: Dark Halos (Amount: 40%, Radius: 60px), Light Halos (Amount 80%, Radius 80px), Threshold zero. So this time Dark Halos are half weaker and three quarters the size of Light Halos.
Mixed Sharpening
So far we’ve seen how to tweak Dark and Light Halos in traditional sharpening to boost fine detail, and how to shape a picture with broader halos in HiRaLoAm to get a three-dimensional effect.
Besides advanced topics (masking and iterative sharpening for instance), an easy yet very effective technique that Double USM only allows is:
- Use Dark Halos at high Amount and low Radius to boost the structure as you’d do with traditional sharpening.
- Use Light Halos to add volume, with low Amount and High Radius as you’d do with HiRaLoAm.
The following is just one example, and it comes from Roberto Bigano’s Plastic Girls project (a 30 years long study on mannequins around the world). This “girl” has been shot with a Canon G12 compact camera, which at 80 ISO delivers an amazing quality, and it’s just a low-res crop 1500px wide.
Applied Double USM values are as follows: Dark Halos (Amount: 500%, Radius: 0.5px), Light Halos (Amount 40%, Radius 40px), Threshold (3 levels).
Experiment!
Sharpening is a topic with quite many ramification – so there’s a lot of room for personal research; your skills will grow as you get more experienced. Have a look to this step-by-step Sharpening Case Study I’ve published some time ago, then start experimenting on your own.
UPDATE
</p>
This is a 3 part series on the Double USM Photoshop plugin.
Even if the version used in this article is older than the current one, the sharpening concepts still apply! Find the new version announcement here
- Introduction (sharpening basics, Double USM)
- Features (interface, functionality and Batch processing)
- Examples (case studies) <- you’re here!
Double USM v2 is available for sale on my website CC-Extensions. </div> </div> </div>