Double USM is the brand new Sharpening script for Photoshop that I’ve coded; in this second post of the series I’ll cover the user interface, functionality and how to record it into an Action for batch processing.
UPDATE
</p>
This is a 3 part series on the Double USM Photoshop plugin.
Even if the version used in this article is older than the current one, the sharpening concepts still apply! Find the new version announcement here
- Introduction (sharpening basics, Double USM)
- Features (interface, functionality and Batch processing) <- you’re here!
- Examples (case studies)
Double USM v2 is available for sale on my website CC-Extensions. </div> </div>
If you’re not familiar with Sharpening or want to recap the basics, I’ve covered the topic extensively here.
Interface
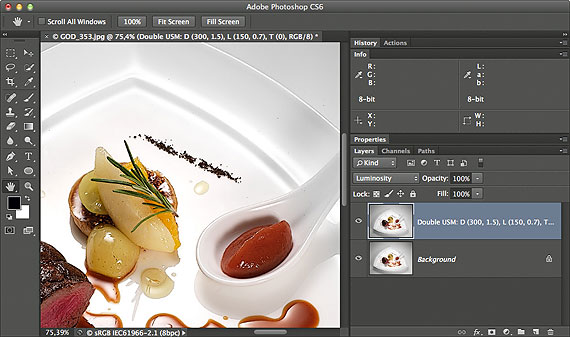
First, access Double USM from the Photoshop’s Filter menu. The User Interface It is quite straightforward, have a look at it:
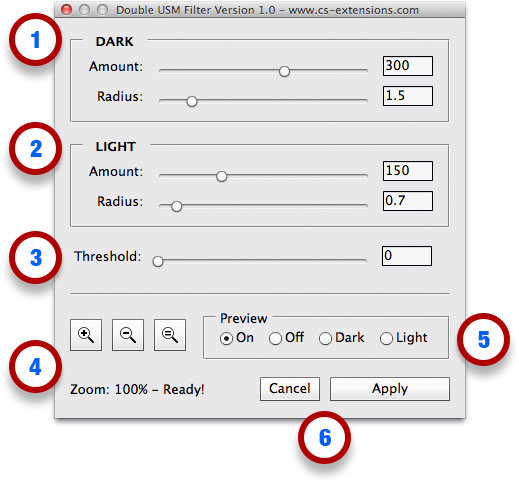
Basically the upper part of the panel is where sharpening controls belong (1, 2, 3), while in the lower part you can find preview tools (4, 5) and confirmation buttons (6). Details as follows:
- Dark Group: these two sliders let you control Amount and Radius for the sharpening’s Dark Halos only (equivalent of the Photoshop’s UnSharp Mask Filter, but darkening only). Input in the text field is allowed too.
- Light Group: same as above, Amount and Radius but for the sharpening’s Light Halos only (text input allowed).
- Threshold: equivalent of the UnSharp Mask Filter – a single control for both Dark and Light Group.
- Zoom: Zoom In, Zoom Out and Fit to Screen buttons. Resize the preview accordingly and inform you of the current zoom level in percent.
- Preview: radio buttons that set the preview either On (you see the effect of both Dark and Light sharpening Halos), Off (unsharpened original), Dark (Dark Halos only), Light (Light Halos only).
- Confirmation buttons: Cancel the dialog and switch back to the original image, or Apply the sharpening effect.
Functionality
Double USM runs on both on 8bit and 16bit files, in Grayscale, RGB, Lab and CMYK working spaces. Open a picture, find Double USM in the Photoshop’s Filter menu:
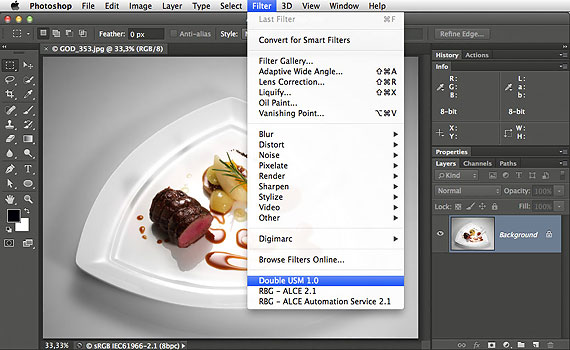
Mind you, you’ve got to select a bitmap layer or a Smart Object in the Layers palette (that is: not a text layer, not a vector shape, just something with raster pixels in it – if you’re not sure what this mean, you have see in the Layers’ palette layer thumbnail your picture, and that’s ok).
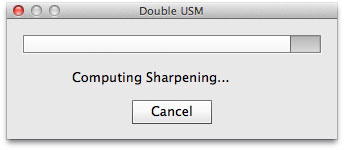 Now Photoshop goes fullscreen to hide disturbing interface elements and a small progress bar window pops up: Double USM must calculate a bunch of Smart Objects with Smart Filters and blending modes in order to operate properly (if you’re curious, the routine is publicly available, I’ve written extensively about it and published a 5 posts series called Decomposing Sharpening) – it should be pretty fast, but it eventually depends on your computer performance.
When Double USM is done with its calculation the main window appears (you can drag it along the screen freely) and you can start tweaking the values.
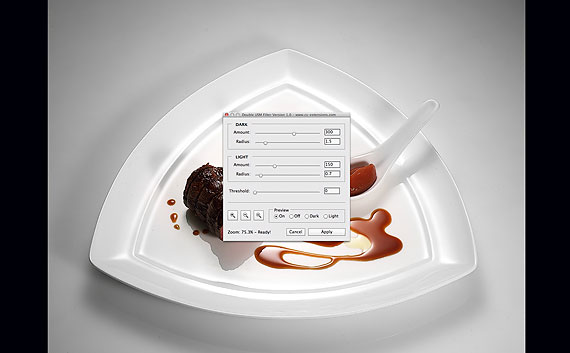
Use the Zoom buttons to reach the zoom level you’re most comfortable with when evaluating sharpening, pan the image (the hand tool is selected by default) to inspect the result in significant areas. You can either drag sliders or input values directly in the text field (press tab to switch between them). The routine’s update takes about half of a second to complete (may be even faster on some computers), so please wait the preview’s refresh of one control, before moving to another one.
The Preview radio buttons are crucial to evaluate the sharpening effect. You can switch it On and Off, but you’re allowed to inspect Light Halos only (Light radio button) or Dark Halos only (Dark radio button): this is particularly useful because you can concentrate on the Dark/Light values separately, then judge their combination (preview: On) before clicking the Apply button.
Mind you: the preview setting that is active when you press Apply will determine the final result. That is to say: if the preview is set to Light when clicking Apply, only Light Halos will be applied – conversely, if the preview is set to Dark, only Dark Halos will survive. So, unless you want it expressly, remember to switch the preview to On before clicking Apply.
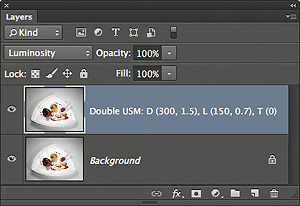 As you see in the Layer’s palette screenshot, the resulting elaboration of the Double USM routine belongs to a new layer (i.e. the original layer is left untouched), named according to the used parameters. In the example, “Double USM: D(300, 1.5), L(150, 0.7), T(0)” means that I’ve applied Amount 300% and Radius 1.5px for the Dark Halos, Amount 150% and Radius 0.7px for the Light Halos, and Threshold has been left to its default, zero. In case you want to apply Double USM to a Smart Object (yes you can), the resulting layer will be a new, raster one anyway – scripts can’t be tied as smart filters (this is a technical limit of the platform).
Lastly, I’d like to mention that no matter whether the layer you’re applying Double USM to is beneath other layers (adjustments, texts, vectors, whatever), the preview and the result will be based on that very layer only – this is consistent with Photoshop’s Filters general behavior.
 Actions
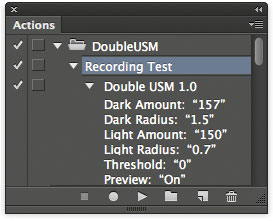
Double USM can be recorded into Actions, so that you’re allowed to apply it on batch via the Photoshop’s File – Automate – Batch command. This is particularly appropriate when you’ve to process blindly large amount of images with output sharpening for instance (before sending them to some kind of printing process).
Just create a new Action and, while recording, run Double USM. You can check later in the Actions palette the used parameters.
That’s basically it for Double USM interface, functionality and the Actions feature. The next post will be about real world examples – traditional, HiRaLoAm and mixed sharpening.
UPDATE
</p>
This is a 3 part series on the Double USM Photoshop plugin.
Even if the version used in this article is older than the current one, the sharpening concepts still apply! Find the new version announcement here
- Introduction (sharpening basics, Double USM)
- Features (interface, functionality and Batch processing) <- you’re here!
- Examples (case studies)
Double USM v2 is available for sale on my website CC-Extensions. </div> </div> </div>