I’m currently working on a project of mine (Photoshop script) that involves sharpening. This has been giving me the opportunity to err (quite a bit) and discover some interesting combinations that may lead to new tools. In this first post of a small multipart series, I’ll review basic concepts like Halo Maps, Subtractions and Blending Modes applied to sharpening.
I’ve always been a great fan of Dan Margulis’ PPW (Picture Postcard Workflow) panel, coded by my dear friend and talented scripter Giuly Abbiati. If you don’t know it, I’m talking about a Photoshop extension filled up with great tools that make Dan’s color correction workflow really speedy and automated – provided that you know the theory behind it. Over the years Margulis has freely distributed updated actions that target very specific topics – of course sharpening is one of them and this is what I’d like to go into.
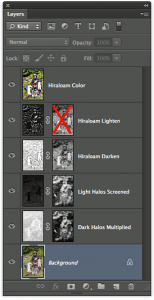
 The last evolution stage of such action (at the time of this post in September 2012, but new versions may appear for this is a very active project) provides you with several layers – each one aiming to a peculiar target: among the rest there are two separate high-frequency sharpening layers, one for Light Halos and one for Dark Halos. If you’re interested in the exact way they’re produced, applied and masked within the context of the PPW workflow, please refer to Dan’s original action and follow each step.
Let’s first approach the idea of creating a Halo Map – that is, a single layer that contains just what is needed in order to sharpen and is applied on top of the original image with an appropriate blending mode. The purpose of such layer is to separate the effect (a detail enhancing filter) from its substrate (the original image).
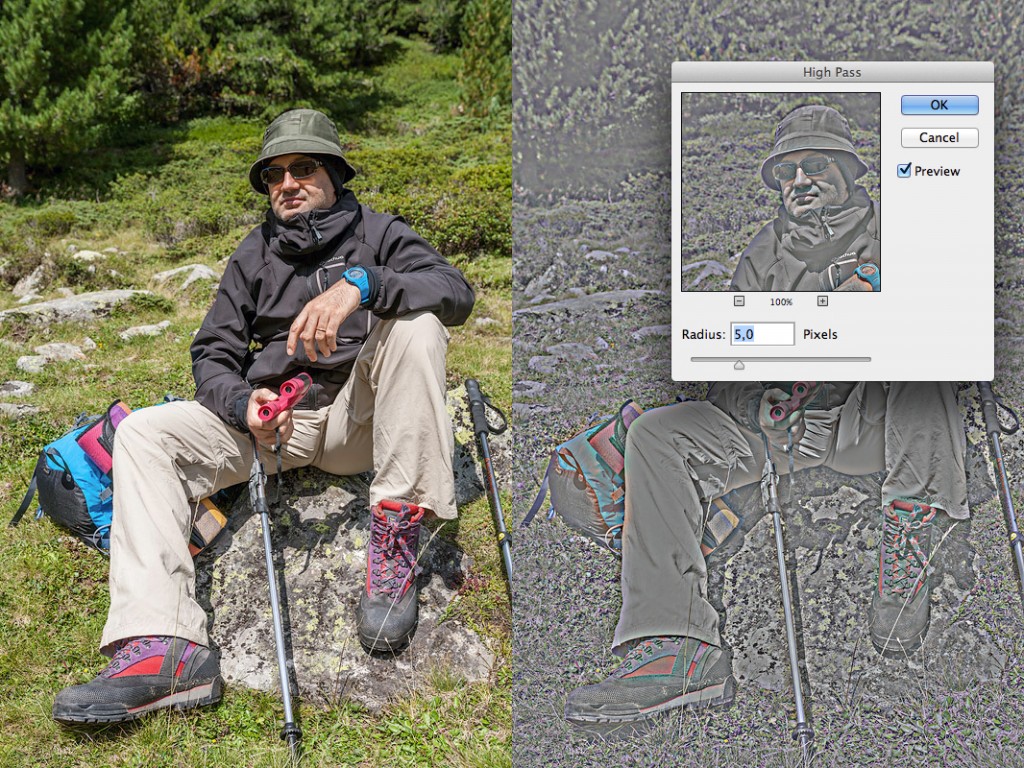
A trivial and well known Halo Map is easily built with the High Pass filter:

Please welcome my friend Santo – here showing his trekking outfit and the result of the High Pass filter
Switching the blending mode to some contrast enhancing one (such Overlay, Soft Light, Hard Light, etc.).
Strangely enough, at least in my personal opinion, High Pass is mainly used for HiRaLoAm (High-Radius-Low-Amount) sharpening – that is, not targeting high frequency detail but as a local contrast enhancer (speaking of which, let me remind you ALCE as my favorite tool ;-)) Bizarre, because there is nothing to prevent you using High Pass to create a traditional sharpening layer.
In a nutshell, the High Pass filter is a quick way to cut every image frequency up to the radius you’ve set: that is, radius 10px replaces with a nice 50% gray everything in the image but frequencies higher than 10px – if this sounds mysterious, dig the topic here. I’m sure you’re willing to know that the result of High Pass Filter is exactly equal to a Subtraction: between the original image and a Gaussian Blurred one (with the same radius).
The only extra detail that you should keep in mind is that Offset is 128. The actual operation performed is then (speaking of values of each pixel, ranging from 0 to 255 alias black to white):
High Pass = 128 + ( Original – Blurred )
Incidentally, 128 is 50% gray, which is the neutral color of contrast enhancing blending modes (i.e. it does not affect the image below)
Be aware that if you like to test this yourself using RGB images, you must set the Photoshop Grayscale Default (Color Settings, Command + Shift + K for Mac or use Ctrl instead of Command for PC – I’ll be using Mac shortcuts throughout the post) to an ICC with a gamma that matches the one of the RGB file you’re working on. If you’re about to ask why, the reason is in the way Photoshop displays channels; as a rule of thumb if your file is ProPhoto RGB, set the Grayscale ICC to Gray Gamma 1.8, if you’re using Adobe RGB or sRGB set it to Gray Gamma 2.2 (more on colorspaces gamma in Bruce Lindbloom’s website)
Let’s move towards more interesting Halo Maps:
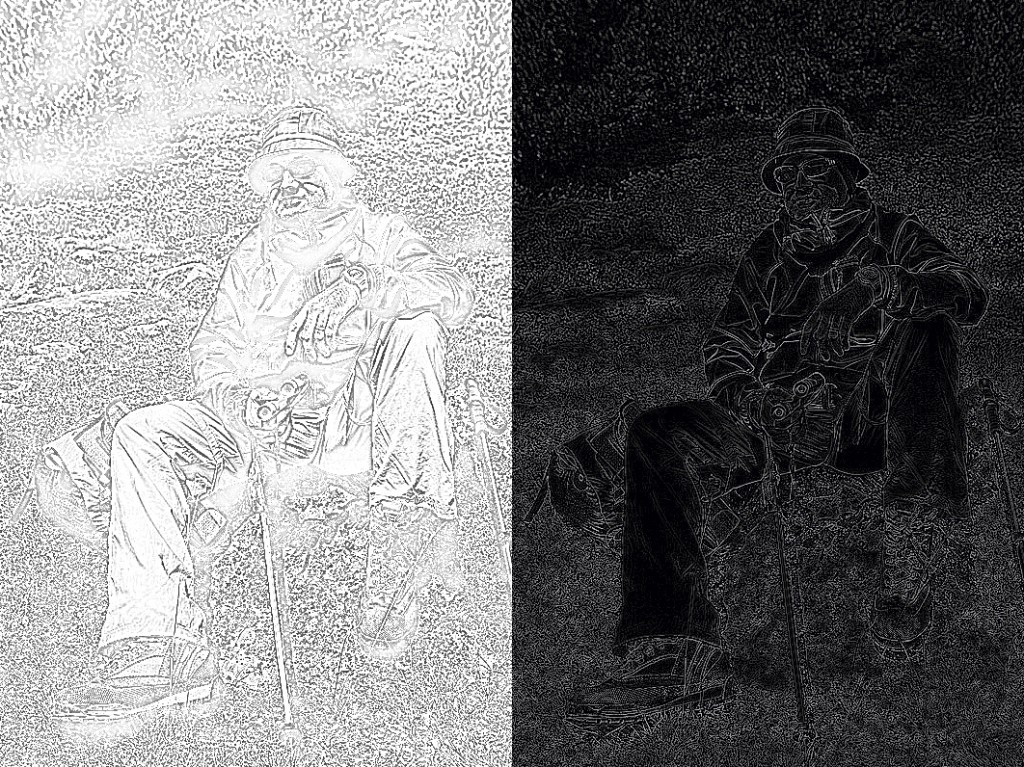
The screenshot above shows the actual high frequency Dark Halos (left) and Light Halos (right) layers from Dan’s PPW sharpening action, without masks. The former is mostly white because its blending mode is set to Multiply – that is, any value is multiplied with the one from below, resulting in darker pixels. How come? Because for the operation the values used are defined in the range 0 to 1 and not 0 to 255 (either way, black to white): this way, if you multiply two 50% grays you end up with 0.5 * 0.5 = 0.25 which is 75% gray (definitely darker). White, which is what Dark Halos map layer is mainly made of, is the neutral color of Multiply.
Not surprisingly, the Light Halos layer looks mostly black, being in Screen blending mode (the inverse of Multiply) – where black is the neutral color.
To sum up, Multiply darkens (neutral: White), Screen lightens (neutral: Black), Overlay is a combination of Screen and Multiply (Gray 50% is the neutral color). It’s contrast enhancing just because it darkens and lightens at the same time, depending on the layer content: darker gray darkens, lighter gray lightens, pivoting on middle gray. Citing Paul Dunn, who has a very informative page about blending modes:
[Multiply] = Base * Blend
[Screen] = 1 – (1-Base) × (1-Blend)
[Overlay, if (Base > ½)] = 1 – (1-2×(Base-½)) × (1-Blend).
[Overlay, If (Base <= ½)] = (2×Base) × Blend
This is what you need to know in order to replicate halo maps such as the ones found in the PPW action. Yet Dan applies them in a peculiar way (I’ll let you the pleasure to decipher the action in order to get the details) – I’ll be describing a more orthodox path, leading to halo maps that emulate the Unsharp Mask filter (USM)
- On a duplicate layer, apply USM, the settings you like the most
- [for Light Halos] Fade to Lighten (Command + Shift + F)
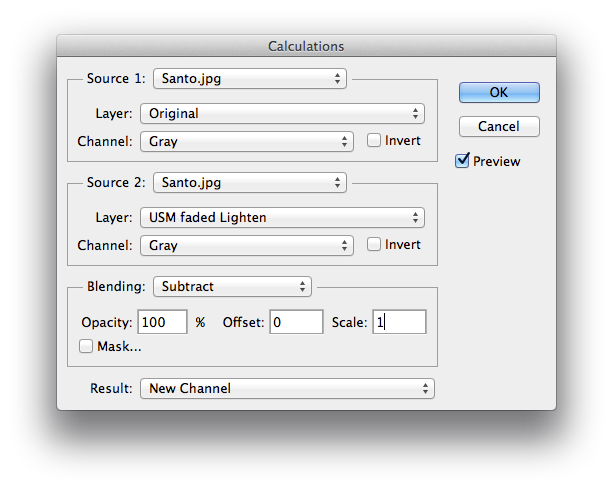
- Use Calculation and Subtract the original to the USM version
That’s it. To get the Dark Halos map instead, just Fade to Darken, subtract the USM faded Darken from the Original and invert the result of the Calculation. A useful shortcut is to use Subtraction blending mode on the USM layer to skip the Calculation step.
Now that you’ve built dark and light layers, set them to the appropriate blending mode. Which one? Dan’s been choosing Multiply and Screen because his workflow involves masks and a slightly different process, yet if you want to get the exact result of the USM filter with the layers we’ve built together you should use Linear Burn and Linear Dodge.
[Linear Burn] = Base + Blend
[Linear Dodge] = Base + Blend – 1
If you look at the math, we’ve first performed a subtraction between Original and Sharpened, to extract the Difference (Halos); then we’re adding back that Difference (Halos) to the Original in order to get back the Sharpened. That is to say:
Sharpened – Original = Halos
Original + Halos = Sharpened
Trivial. But… What for?! Many interesting little things, for instance driving separately the Amount and Radius of Dark and Light Halos in Sharpening – a common feature in Drum Scanners’ softwares in the past, missing in Photoshop today – as you’ll see in the next post of the series.
The Decomposing Sharpening series has been written as a research project for my script DoubleUSM: multi-radius sharpening. You might be interested also in Fixel Detailizer 2PS: multi-frequency contrast booster.


